MeshCentral Guide
Video Walkthru
Abstract
This user guide contains all essential information for the user to make full use of MeshCentral, a free open source web-based remote computer management software. The guide provides quick steps to setup administrative groups to remote control and manage computers in local network environments or via the Internet. Latter parts of the document will cover some advanced topics. The reader is expected to already have some of the basic understanding on computer networking, operating system and network security.
Introduction
MeshCentral is a free open source web-based remote computer management software. You could setup your own management server on a local network or on the internet and remote control and manage computers that runs either Windows* or Linux* OS.
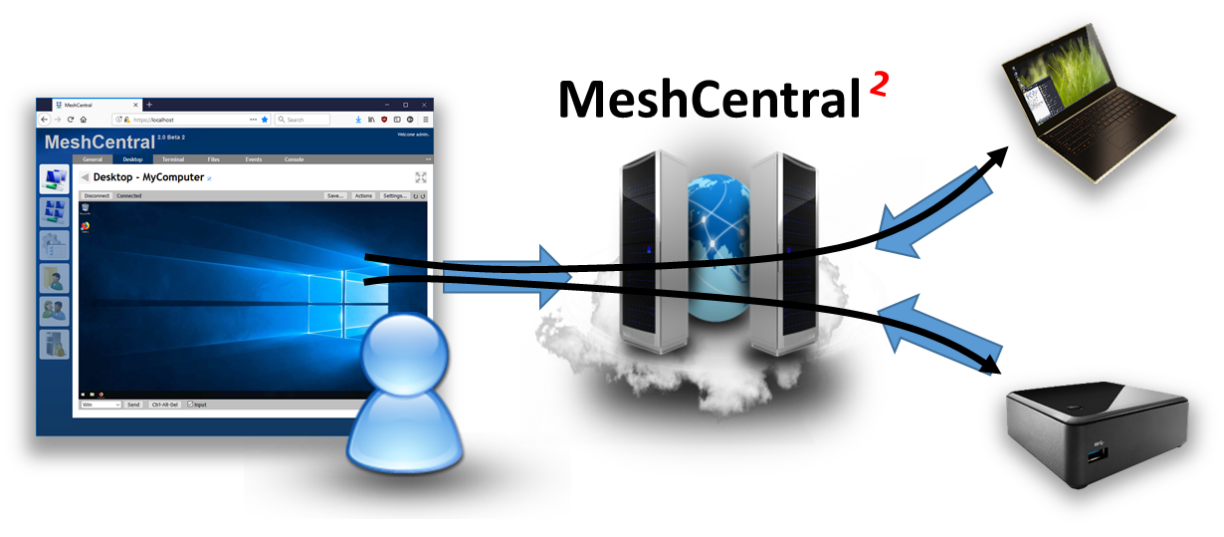
To begin, a base or management server will be required. A management server could be any computing device (PC or VM) that has sufficient compute, storage and reliable network components to host an environment for MeshCentral and deliver good performance during remote management exercise. Whilst there are many configurations available for advanced users, typical server setup would only take just a few minutes to complete.
At a high level, there are only four (4) main steps: Setup, Install, Connect and Control.
- Setup the MeshCentral server on VM or PC
- Log on to MeshCentral portal with a valid account, creates an administrative mesh to collect all end-points (systems to be managed)
- Generates an agent and installs it on a target or each end-point that immediately attempts a connection back to MeshCentral server.
- Controls/manages assets or end-points that are available in respective administrative mesh
Server Installation
Because the MeshCentral server is written in NodeJS it can be installed on many operating systems including Windows, Linux. Please refer to the MeshCentral Installer’s Guide available at https://www.meshcommander.com/meshcentral2 for information on how to install the server.
The server can be installed both on a local area network for local computer management and in the cloud for management of computers over the Internet. You can also install it on small IoT devices like a Raspberry Pi all the way to big servers. It’s recommended to get started with a test setup to get a feel for this server. Once installed, come back to this document for configuring and using your new server.
Basic Usage
In this section we will cover the basics of MeshCentral in your newly setup server.
Launch
Start your web browser and access MeshCentral via IP address/URL, http://serverFQDN/. If MeshCentral is running locally, enter http://127.0.0.1/. MeshCentral will redirect the browser to HTTPS if the server was accessed with HTTP. Once on HTTPS you will likely see this message:
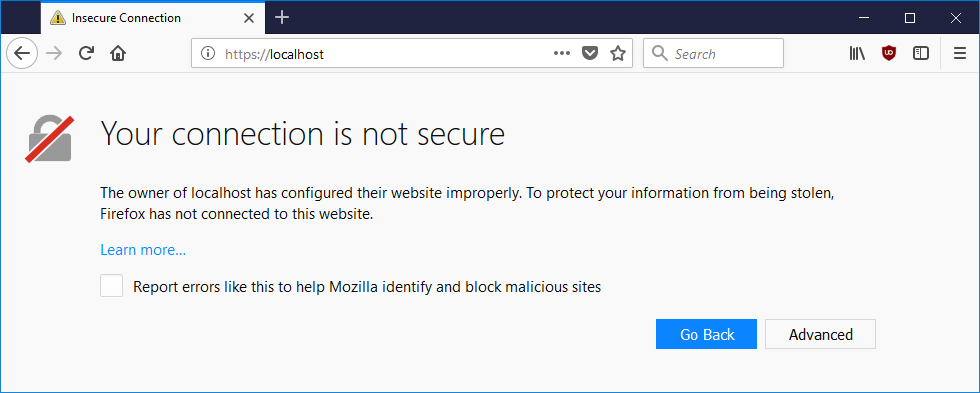
This is because by default MeshCentral is using a self-signed certificate that is not known to the browser as a “trusted” or “trustworthy” certificate. To prevent this warning from recurring, the following chapter will provide useful steps that can be considered.
To proceed on Firefox browser,
- Click on “Advanced”, “Add Exception” and “Confirm Security Exception”
To proceed on Chrome Browser,
- Click on “Advanced”, “Proceed to http://serverIP (unsafe)”
Note: You can also get to a device by specifying the device name in the URL by adding ?viewmode=10&gotodevicename=MyComputer to the URL of the MeshCentral web page. The new gotodevicename will find a device with the specified name and navigate to that device’s page. This is perfect for integrating MeshCentral with other solutions but be aware that a computer name is not a unique identifier and so, &gotonode= is always the preferred way to access a device. This feature also works on the mobile web site.
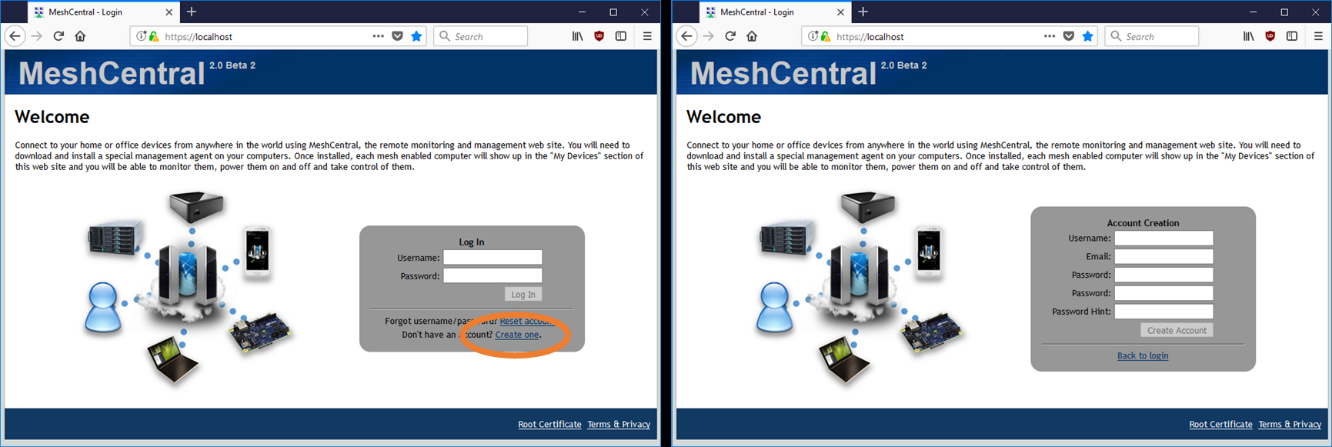
Create Account
Create an account by clicking “Create One” and click “Create Account” once the text fields had been populated correctly.
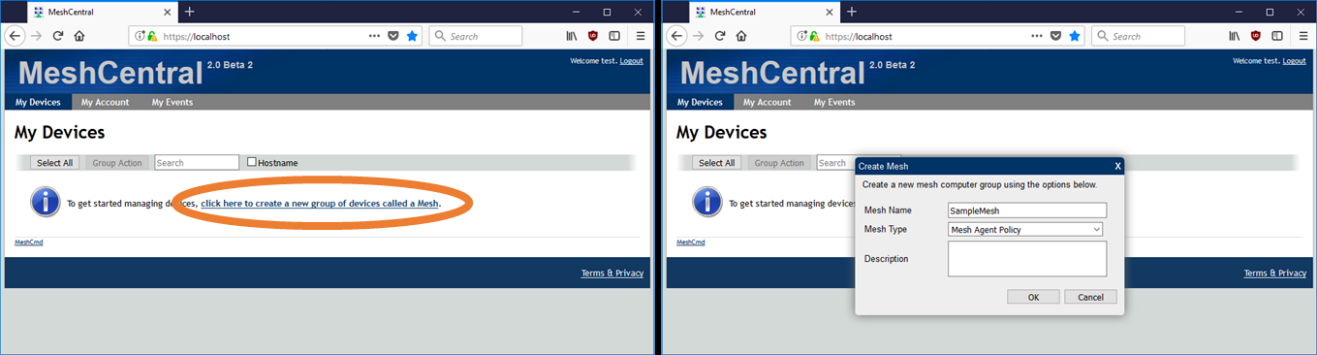
New device group
Once logged in, create a new device group. This is a group of computers that we want to manage. To proceed,
- Click on “Click here to create a new group of devices”,
- Key in a suitable “Name”, .e.g. “SampleGroup”
- Leave “Type” to default “Manage using a software agent” and click ‘OK”.
Note
There are two types of groups:
Software Agent Group: Commonly used to manage computers. Administrator must install a “remote management agent” on the remote computers.
Intel® AMT Agent-less Group: Exclusive for remote computers that has Intel® AMT activated and needs to be managed independent of a “remote management agent”.
Add device
To add devices into new mesh
- Click “Add Agent”,
- Select the right Operating Systems (Windows* OS) and download the Mesh Agent executable.
- Copy the Mesh Agent file into remote computers with Windows* OS
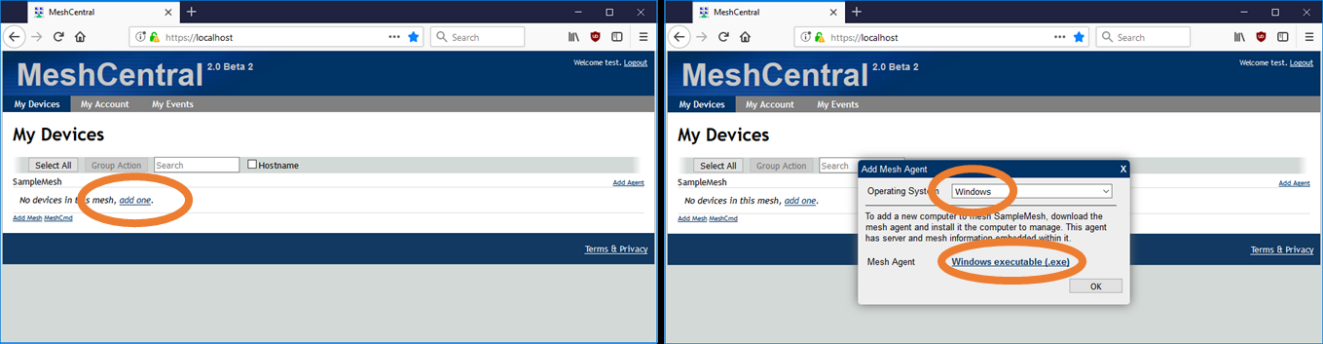
- Run Mesh Agent and Click “install”

Note
Mesh Agent is available for Windows* and Linux*. For Windows*, the mesh agent doesn’t contain any sensitive data and can copied and reused on many Windows* computers. For Linux*, instead of an executable, an installation script is provided to add remote computers. The script checks the type of computer and installs the proper agent automatically.
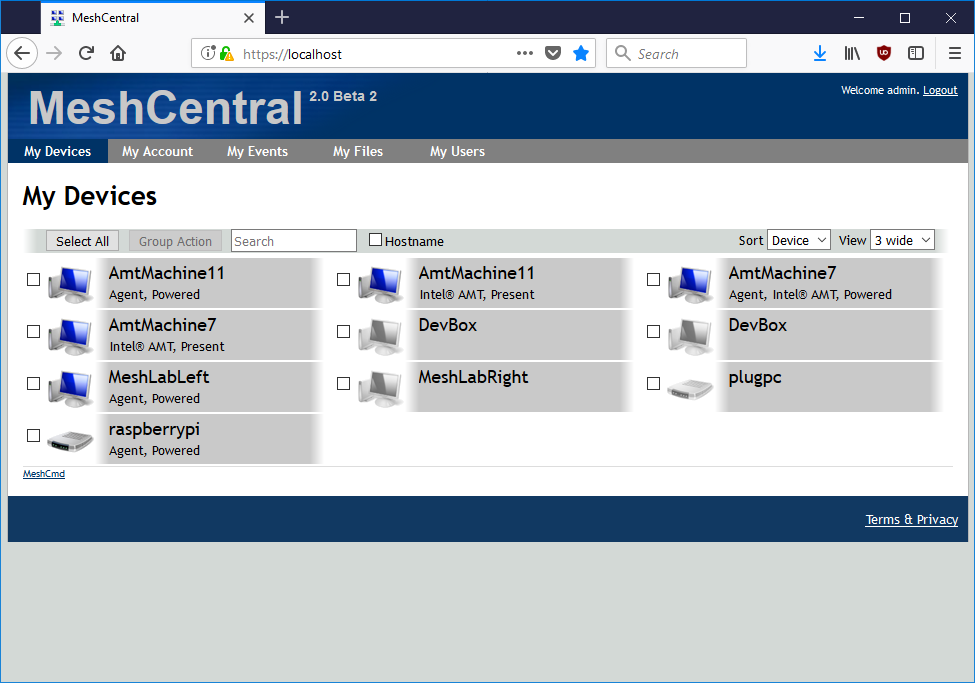
After agent install
Once the agents are installed, it will take up to a minute before the computer shows up on the user’s account automatically. Click on each computer to access it and user can rename the each computer with a unique name and icons.
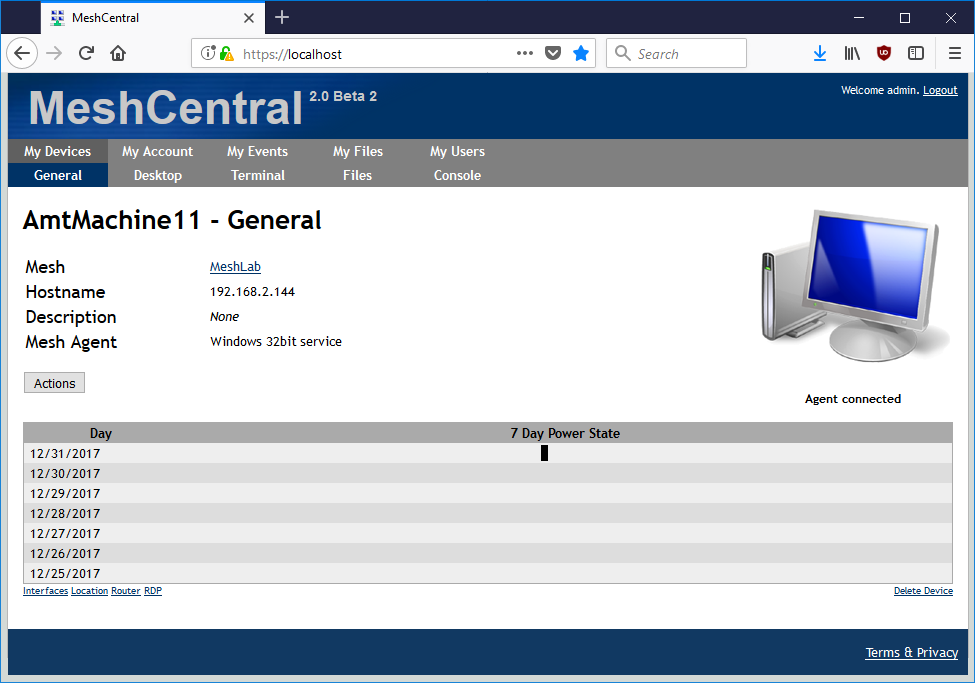
Manage Computer
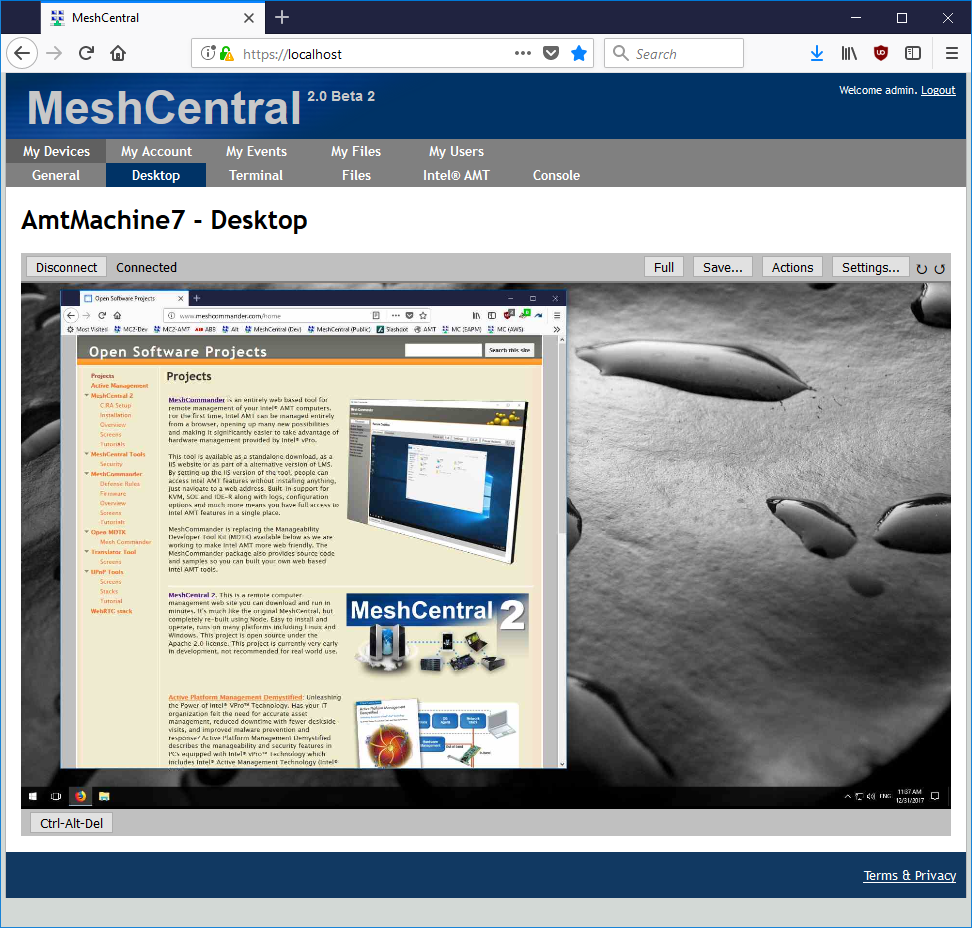
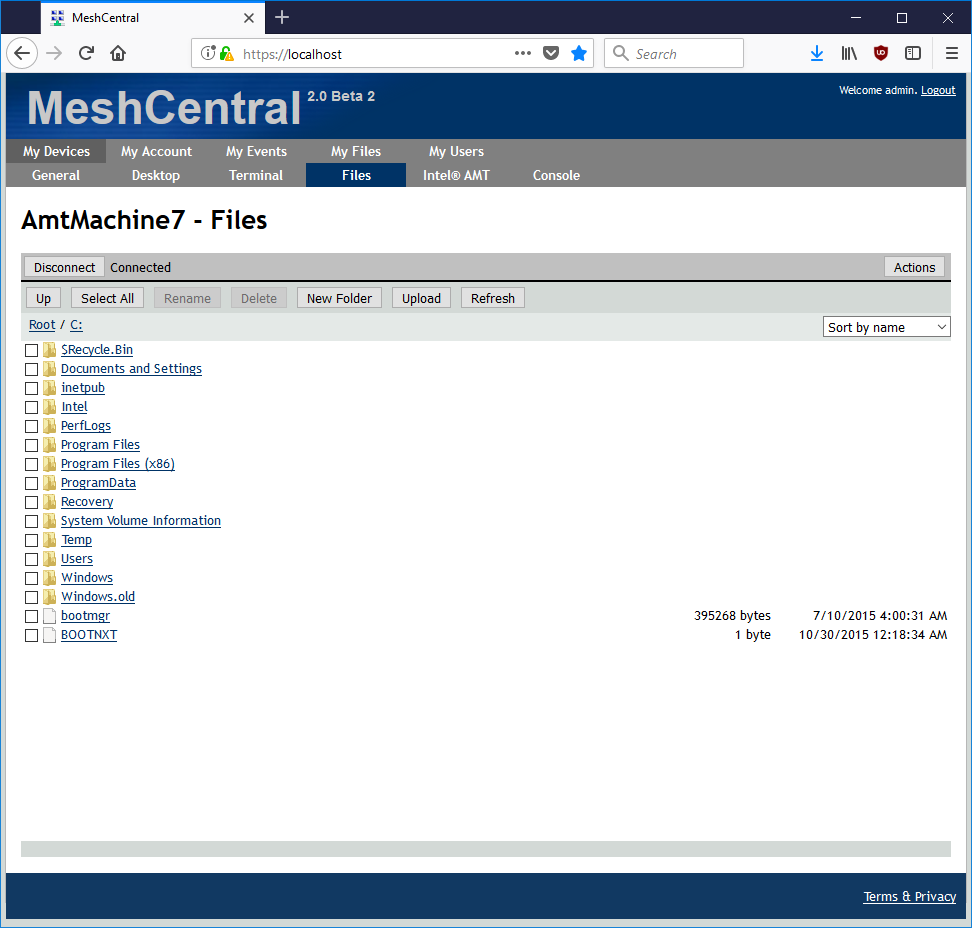
Click on any computer and go into the “Desktop” and “Files” tabs to remotely manage the computer or perform file transfer.
For advance users with console/command line interface experience, go into “Terminal” to perform scripting or quick tasks with CLI tools.
Desktop Control
Depending on how the agent is connected to the server, there are multiple methods to remote control. Mesh Agent, RDP, and AMT
For RDP connections, if you have previously saved the credentials that is usable by all users on the system. If you want to remove those saved credentials that's under the General Tab > Credentials. Click pen to clear them.
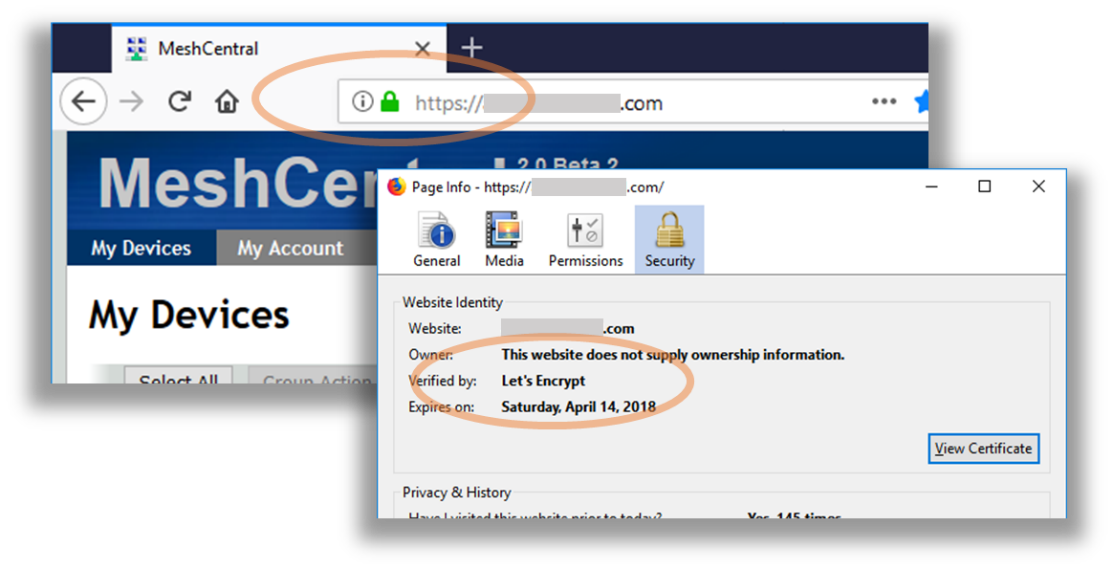
Server Certificate
As seen in the previous chapter, MeshCentral is setup with a self-signed certificate by default and the web browser will issue a warning concerning the validity of the certificate.
Users have few ways to handle this certificate warning:
- Ignore the warning and proceed with an exception in a recurring fashion. However, traffic from the server to the web browser remains encrypted. User must check the validity of the certificate presented by the website and compare with “webserver-cert-public.crt” file in the “meshcentral-data” folder of the server.
- Add webserver’s root certificate into web browser’s trust list. Click on “Root Certificate” link at the bottom right of login page to download the root certificate of the web server and then add/import this as a trusted certificate into web browser. Some web browser may require a restart before the certificate installation takes effect.
- If you own a domain name that points to your MeshCentral server, you can get a free trusted certificate using Let’s Encrypt (https://letsencrypt.org/). See the section on Let’s Encrypt in this document for more information on this option. MeshCentral has built-in support for Let’ Encrypt.
Important
Before adding/importing the certificate, user must check the validity of the certificate presented by the website and compare with “root-cert-public.crt” file in the “meshcentral-data” folder of the server.
For large scale deployments or setup, a legitimate trusted certificate is highly recommended for your web server. This way, any web browser that navigates to this web server will be able to readily verify its authenticity.
- If a legitimate trusted certificate is available, replace “webserver-cert-public.crt” and “webserver-cert-private.key” with your certificate. These files are located in “meshcentral-data” folder of the server.
- If intermediate certificates are needed, add the files “webserver-cert-chain1.crt”, “webserver-cert-chain2.crt”, “webserver-cert-chain3.crt” respectively with the intermediate certificates.
Note: If you are using TLS offloading, see the section on “TLS Offloading” cover in the latter parts of this document.
Files and Folder Structure
It’s important to know the basic file and folder structure from which MeshCentral was installed as shown below

Right after running the “npm install meshcentral” command, the node_module folder will be created which contains meshcentral and all of its dependent modules. When the server executes for the first time, both meshcentral-data and meshcentral-files folders will be created.
Important
User must periodically backup both meshcentral-data and meshcentral-files which contains all of server’s data.
The “meshcentral-data” folder will contain:
meshcentral.db file: The server’s database file which contains all of the user and computer information. This includes account information and other sensitive information.
Five .key and .crt files: These are the server’s certificates and private keys. They are used to securely identify the server. The .key files must not be obtained by anyone else since they could be used to impersonate the server.
config.json file: This is the server’s configuration file. It first starts with a sample configuration that you can change. In a following section, we will discuss how to edit this file to customize the server.
The “meshcentral-files” folder contains user files that have been uploaded to the server. This folder can be quite large, especially if no user space quota is set in the config.json file. Users can upload a significant amount of files on the server.
Important
Back-up the “meshcentral-data” folder since this is the folder needed to reconstruct the server if something goes wrong. Without it, user will to start over. Recommended to apply suitable encryption on both folders given that they contain sensitive data.
Server Configuration File
In the “meshcentral-data” folder, there is a file called config.json that contains the main configuration of the server. A sample configuration file could look like this:
    {
        "settings": {
            "cert": "mesh.myserver.com",
            "port": 8080,
            "redirport": 81
        },
        "domains": {
            "": {
                "title": "MyServer",
                "title2": "Servername",
                "userQuota": 1048576,
                "meshQuota": 248576,
                "newAccounts" : 1
            },
            "Customer1": {
                "title": "Customer1",
                "title2": "Extra String",
                "newAccounts" : 0
            }
        },
        "peers": {
            "serverId" : "Server1",
            "servers": {
                "Server1": { "url": "wss://192.168.1.100:443/" },
                "Server2": { "url": "wss://192.168.1.101:443/" }
            }
        }
    }
First, we will look at each of the top levels of the configuration file. The tops levels are “settings”, “domains”, “peers”, and “smtp” as shown in the table below.
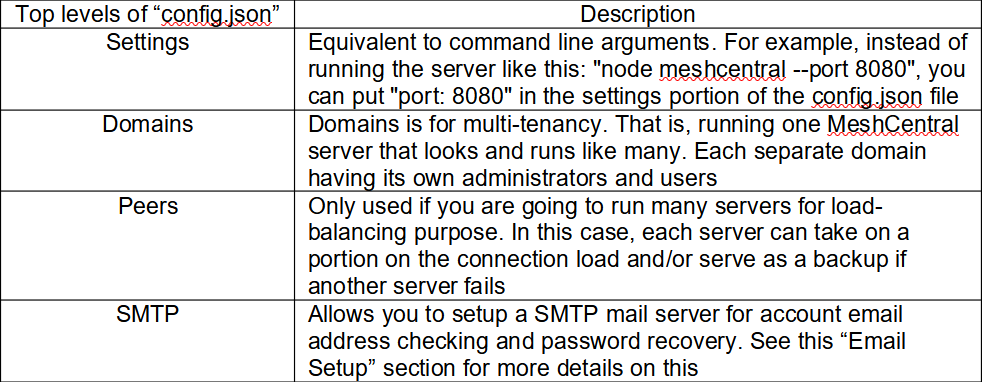
Settings
As indicated before, the settings section of the config.json is equivalent to passing arguments to the server at runtime. Below is a list of settings that are available for the user.
| Settings Option | Description |
|---|---|
| Cert | Sets the DNS name of the server. If this name is not set, the server will run in "LAN mode". When set, the server"s web certificate will use this name and the server will instruct agents and browsers to connect to that DNS name. You must set a server DNS name to run in "WAN mode". MeshCentral will not configure your DNS server. The DNS name must be configured separately. |
| Port | This sets the main web port used by the MeshCentral server and it"s the same port that users and mesh agents will connect to. The default port is 443, but if the port is busy, the next available higher port is used (.e.g. 444) |
| AliasPort | Sets the main port that will be used by the server externally. By default is the same as "Port" above, but can be set to be different when next. See "Server port aliasing" section for more details. |
| RedirPort | This is the port for redirecting traffic in the web server. When the server is configured with HTTPS, users that uses HTTP will be redirected to HTTPS. Port 80 is the default port. So, redirection will happen from port 80 to port 443. |
| MpsPort | Port for Intel" AMT Management Presence Server to receive Intel" AMT CIRA (Client Initiated Remote Access) connections. The default is port 4433. This port is disabled in LAN mode. If user don"t plan on using Intel" AMT for management, this port can be left as-is. |
| TLSOffload | By default this option is set to "false". If set to "true", server will run both web port and the Intel AMT MPS port without TLS with the assumption that a TLS offloading is taking care of this task. For further details, see the "TLS Offloading" section. This option can also be set to the IP address of the reverse-proxy in order to indicate to MeshCental to only trust HTTP X-Forwarded headers coming from this IP address. See the "Reverse-Proxy Setup" section for an example. |
| SelfUpdate | When set to "true" the server will check for a new version and attempt to self-update automatically a bit after midnight local time every day. If set to a specific version such as "1.1.21" the server will immediately update to the specified version on startup if it's not already at this version. |
| SessionKey | This is the encryption key used to secure the user"s login session. It will encrypt the browser cookie. By default, this value is randomly generated each time the server starts. If many servers are used with a load balancer, all servers should use the same session key. In addition, one can set this key so that when the server restarts, users do not need to re-login to the server. |
| Minify | Default value is 0, when set to 1 the server will serve "minified" web pages, that is, web pages that have all comments, white spaces and other unused characters removed. This reduces the data size of the web pages by about half and reduced the number requests made by the browser. The source code of the web page will not be easily readable, adding "&nominify=1" at the end of the URL will override this option. |
| User | Specify a username that browsers will be automatically logged in as. Useful to skip the login page and password prompts. Used heavily during development of MeshCentral. |
| NoUsers | By default this option is "false" and if set to "true", server will only accept users from localhost (127.0.0.1) and will not have a login page. Instead, a single user is always logged in. This mode is useful if user opts to setup MeshCentral as a local tool instead of as a multi-user server |
| MpsCert | Specifies the official name of the Intel AMT MPS server. If not specified, this is the same as the official server name specified by "cert". This option is generally used with MPS aliasing, see the "Server port aliasing" section for more information. |
| MpsAliasPort | Specify an alias port for the MPS server. See the section on "Server port aliasing" for use of this option. |
| ExactPorts | If this option is set to "true", only the exact port will be used. By default, if a port is in use, the server will try to bind the next available higher port. This is true for the "port", "redirport" and "mpsport" settings. |
| Lanonly | Server"s default mode if not set with "--cert" option. If this option is set to "true", Intel" AMT MPS will be disabled, server name and fixed IP option will be hidden. Mesh agents will search for the server using multicast on the network. |
| Wanonly | A recommended option when running MeshCentral in the cloud. If set to "true", server will run as a cloud service and assumes LAN features are disabled. For this option to work, the server must have a fixed IP or DNS record using the "--cert"" option. In this mode, LAN discovery features are disabled. |
| AllowFraming | By default is set to "false". If set to "true", web pages will be served in a way that allows them to be placed within an iframe of another web page. This is useful when you wish to add MeshCentral features into another website. |
| AllowLoginToken | By default is set to "false". If set to "true", the server allows login tokens to be used in the URL as a replacement for user login. This is useful along with "allowFraming" option to embed MeshCentral features into another website. |
| MongoDB | Used to specify the MongoDB connection string. If not specified, MeshCentral will use the NeDB database with the file meshcentral.db in the meshcentral-data folder. To setup MongoDB, please refer to the Database section of this document. |
| MongoDBCol | Used to specify the MongoDB collection name in the database. By default this value is "meshcentral". See Database section for more details on MongoDB setup. |
| DbEncryptKey | Specifies a password used to encrypt the database when NeDB is in use. If wanting to encrypt an existing database, use the "dbexport" and "dbimport" to save and reload the database with the encryption password set. |
| WebRTC | Set to "true" or "false" depending if you want to allow the server to setup WebRTC communication. If WebRTC is setup, management traffic will flow directly between the browser and mesh agent, bypassing the server completely. The default is false now, but will be switched to true when WebRTC is ready for production. |
| ClickOnce | Set to "true" or "false" to allow or disallow browser ClickOnce features. When enabled, browsers running on Windows will be shown extra options to allow RDP and other sessions thru the MeshCentral server. This requires ClickOnce browser support that is built-in to IE and available as add-in to Chrome and Firefox. Default is true. |
Important
Changes in config.json will NOT take effect until server is restarted.
Note: We recommend the user to use a non-production server to experiment the setting options above.
Domains
In the domains section, you can set options for the default domain ("") in addition to creating new domains to establish a multi-tenancy server. For standard configuration, the root domain and other domains will be accessible like this:
https://servername:8080/ <- default domain
https://servername:8080/customer1 <- customer1 domain
https://servername:8080/customer2 <- customer2 domain
When a user setup many domains, the server considers each domain separately and each domain has separate user accounts, administrators, etc. If a domain has no users, the first created account will be administrator for that domain. Each domain has sub-settings as follows:
| Sub Settings | Description |
|---|---|
| Title & Title2 | This are the strings that will be displayed at the banner of the website. By default title is set to “MeshCentral” and title2 is set to a version number |
| UserQuota | This is the maximum amount of data in kilobytes that can be placed in the “My Files” tab for a user account. |
| MeshQuota | This is the maximum amount of data in kilobytes that can be placed in the “My Files” tab for a given mesh |
| NewAccounts | If set to zero (0) |
| UserAllowedIP | Allows user to set a list of allowed IP addresses. See section on server IP filtering. |
| Auth | This mode is often used in corporate environments. When server is running on Windows and this value is set to “sspi”, domain control authentication to the website is performed. In this mode, no login screen is displayed and browser will authenticate using the user’s domain credentials. |
| Dns | The DNS record for this domain. If specified, the domain is accessed using a DNS record like “customer1.servername.com” instead of “servername/customer1”. This feature requires the DNS server to be configured to point this server with a valid DNS record. |
| CertUrl | Load the TLS certificate for this domain from this https url. For example “https://127.0.0.1:123”. This option is useful when used along with the “TlsOffload” option. When MeshCentral is not doing any TLS but has a reverse-proxy or TLS offload device doing this work in front of the server, you can use this to have MeshCentral load the certificate from the server in front of MeshCentral. This is needed because when agents connect, they need to be told that the certificate they saw upon connecting is the correct one. Using this, MeshCentral will know what certificate the agents are expected to see. |
| PasswordRequirements | Used to specify the minimum password requirements for user authentication to this domain. By default, no password requirements are enforced but the user will see a password strength indicator that is not backed by any verifiable data. The value must be set to an object, for example: { ""min"": 8, ""max"": 128, ""upper"": 1, ""lower"": 1, ""numeric"": 1, ""nonalpha"": 1 }This indicated that passwords must be at least 8 characters long and have at least one upper case, one lower case, one numeric and one non-alphanumeric character. You can also set the maximum length of the password, however MeshCentral has already a limit of 256 characters. Specifying anything above this will have no effect. Note that password requirements for Intel® AMT are defined by Intel and so, Intel® AMT passwords will always be verified using a separate set of requirements. |
Note: When the DNS value is set for a domain, user can’t access the domain using “servername/customer1” instead it must be accessed with the valid DNS record and the DNS server should be setup to have two or more DNS records pointing to the same IP address.
In this mode, the server will serve a different TLS certificate depending on what DNS record is used to access the server.

As shown in the example above, we have two names that point to the same IP address. Since the configuration specifies the “dns” value, the second domain is only shown when the right name is used. We use “meshcentral” and “devbox” for DNS names, but in practice the user will use fully qualified domain names (FQDN) like “meshcentral.com” or “devbox.meshcentral.com”.
Server Peering
MeshCentral supports server peering. User could setup up many servers to share the task of handling incoming connections from managed clients and consoles. For server peering to function, all servers must have access to the same database, use the same certificates, the same configuration (with the exception of the server name) and servers must be able to communicate with each other behind a load balancer.
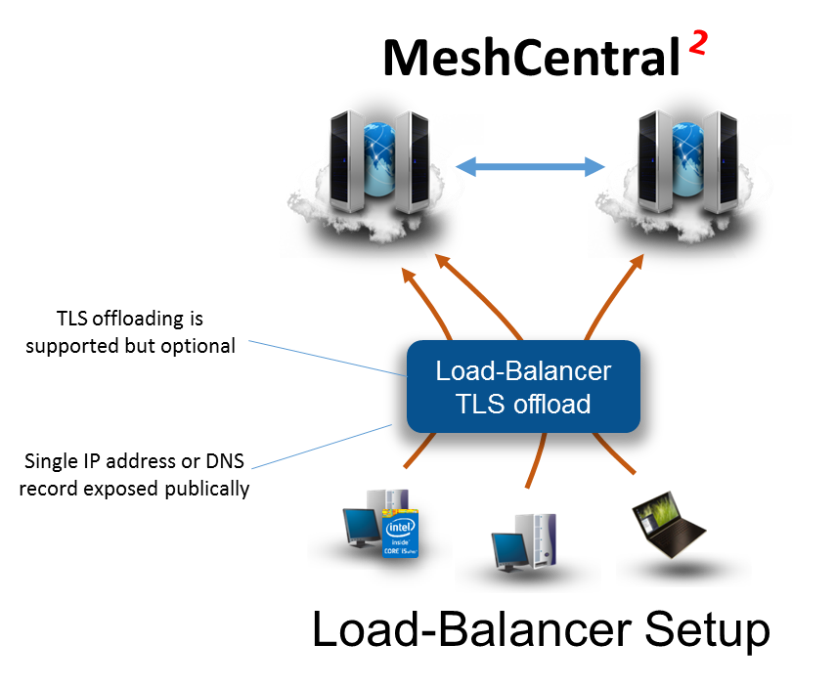
Hence, the user is expected to have good understanding on networking, server administration and applications to accomplish this setup. This document will not get into the details of setting up a load-balancer.
Recommended
Before setting up MeshCentral peering, database migration from NeDB database to MongoDB with replication/sharding option enabled is highly recommend. See: Setting up MeshCentral with MongoDB (section 8.4)
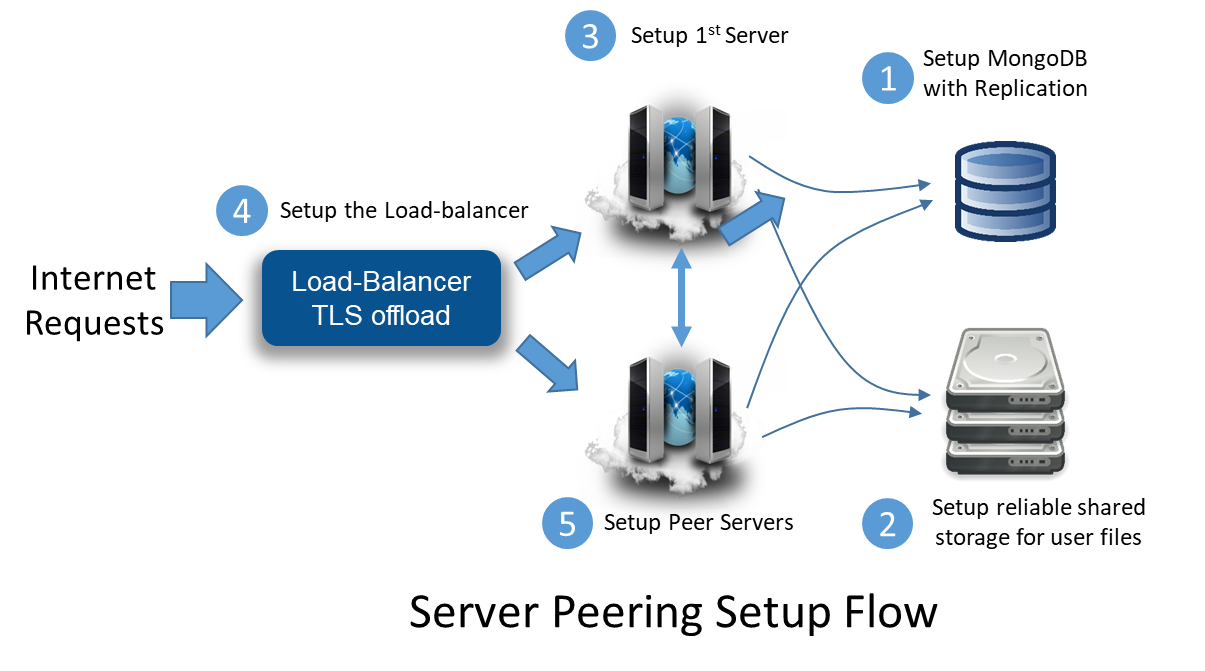
The setup flow above guides the user to pull together server peering setup with Meshcentral. (2) Shared storage is compulsory to host user files and it must be accessible from all of the servers. If the server is expected for critical work, replicated shared storage should be considered.
When Meshcentral is ready for peering setup (5), replicate the “meshcentral-data” directory on each server and configure the “peers” section of the config.json file as shown below.
    {
        "peers": {
            "serverId" : "Server1",
            "servers": {
                "Server1": { "url": "wss://192.168.1.100:443/" },
                "Server2": { "url": "wss://192.168.1.101:443/" }
            }
        }
    }
The configuration above assumes that server1 has an IP address of ‘192.168.1.100’ and server2 has ‘192.168.1.101’ respectively. The "serverId" value is a short and unique identifier for each server and it is optional. If it's not specified, the computer hostname is used instead.
The “servers” section of the configuration file should have the identifier of the server followed by each websocket URL and port (generally 443) of the peer servers. If the servers are running with “--tlsoffload”, then use “ws://” for the URL instead of “wss://”.
When the MongoDB is setup for the first time, a unique identifier is generated and written into the DB. To prevent situations where two servers with different database from peering together, during peering process, each server will validate among each other if they have the same unique DB identifier. Peering connection will only succeed if this condition is met.
Once peered, all of the servers should act like one single host, no matter which server the user(s) are connected to.
Email Setup
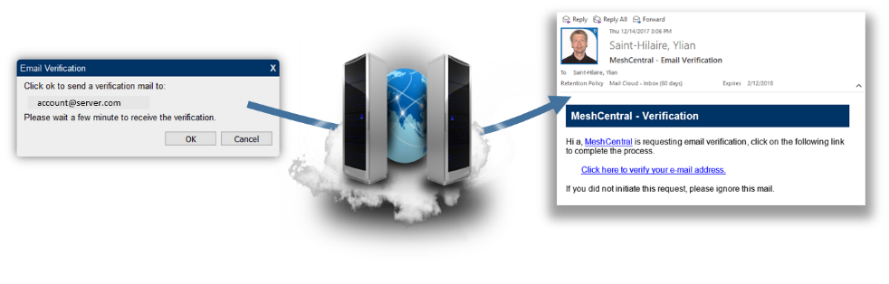
We highly recommend the use of an email server (SMTP) because we could allow MeshCentral to verify user account’s email address by sending a confirmation request to the user to complete the account registration and for password recovery, should a user forget account password as illustrated below
A verification email is sent when a new account is created or if the user requests it in the “My Account” tab.
The password recovery flow when “Reset Account” is triggered at the login page.
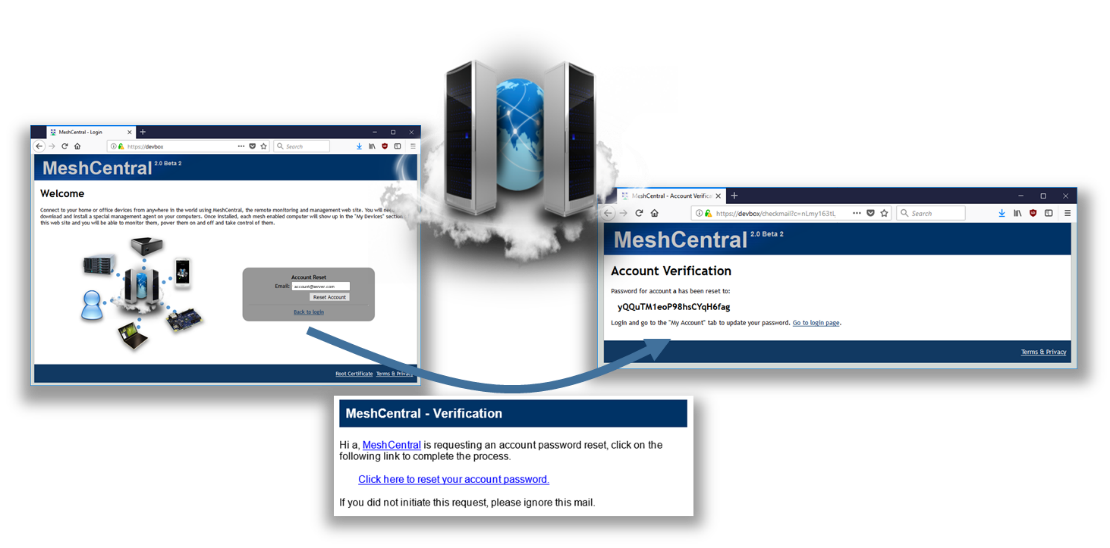
Both account verification and password recovery are triggered automatically once SMTP mail server configuration is included into the config.json file.
SMTP: User/Pass
Normal Server
Update the config.json with “smtp” section as shown below and restart the server.
{
  "smtp": {
    "host": "smtp.server.com",
    "port": 25,
    "from": "myaddress@server.com",
    "user": "myaddress@server.com",      # Optional
    "pass": "mypassword",                # Optional
    "tls": false                         # Optional, default false
  }
}
Please map the host, port values to connect to the right host that provides this SMTP service. For “from” value, administrators may put something like donotreply@server.com, but often times it needs to be a valid address since SMTP server will not send out messages with an invalid reply address.
Some SMTP servers will require a valid username and password to login to the mail server. This is to prevent unauthorized e-mail correspondence. TLS option can be set to ‘true’ if the SMTP server requires TLS.
Gmail
One option is to configure MeshCentral work with Google Gmail by setting “host” with smtp.gmail.com, and “port” with 587. In the config.json file, use user’s Gmail address for both “from” and “user” and Gmail password in the “pass” value. You will also need to enable “Less secure app access” in for this Google account. It’s in the account settings, security section:
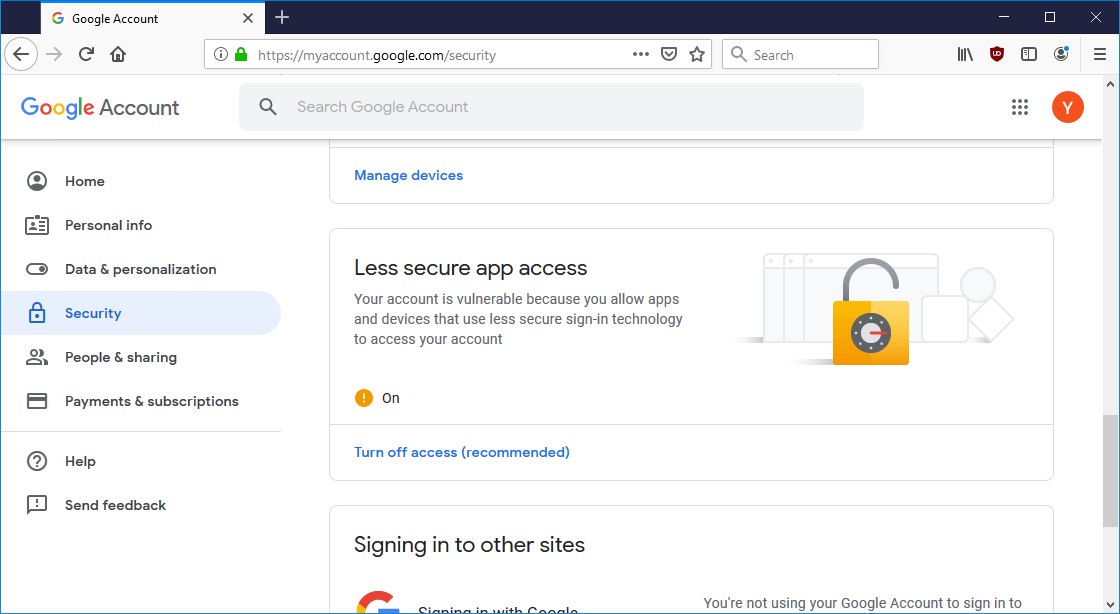
If a Google account is setup with 2-factor authentication, the option to allow less secure applications not be available. Because the Google account password is in the MeshCentral config.json file and that strong authentication can’t be used, it’s preferable to use a dedicated Google account for MeshCentral email.
SMTP: OAuth Authentication
Gmail
Google has announced that less secure app access will be phased out. For Google Workspace or G-Suite accounts, the following process can be used to allow OAuth2 based authentication with Google's SMTP server. It is likely a very similar process for regular Gmail accounts.
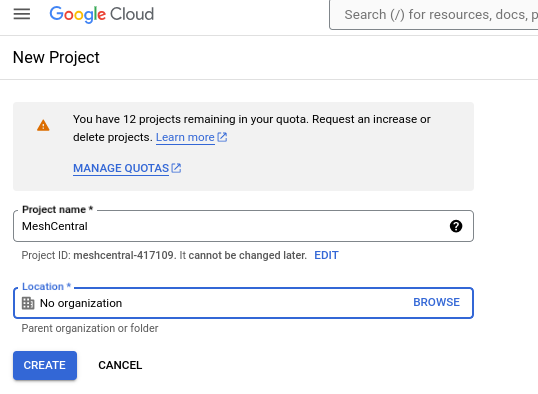
Start by visiting the Google API console:
https://console.developers.google.com/
First, you will create a new project. Name it something unique in case you need to create more in the future. In this example, I've named the project "MeshCentral"
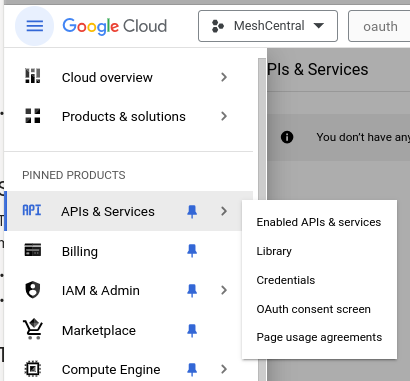
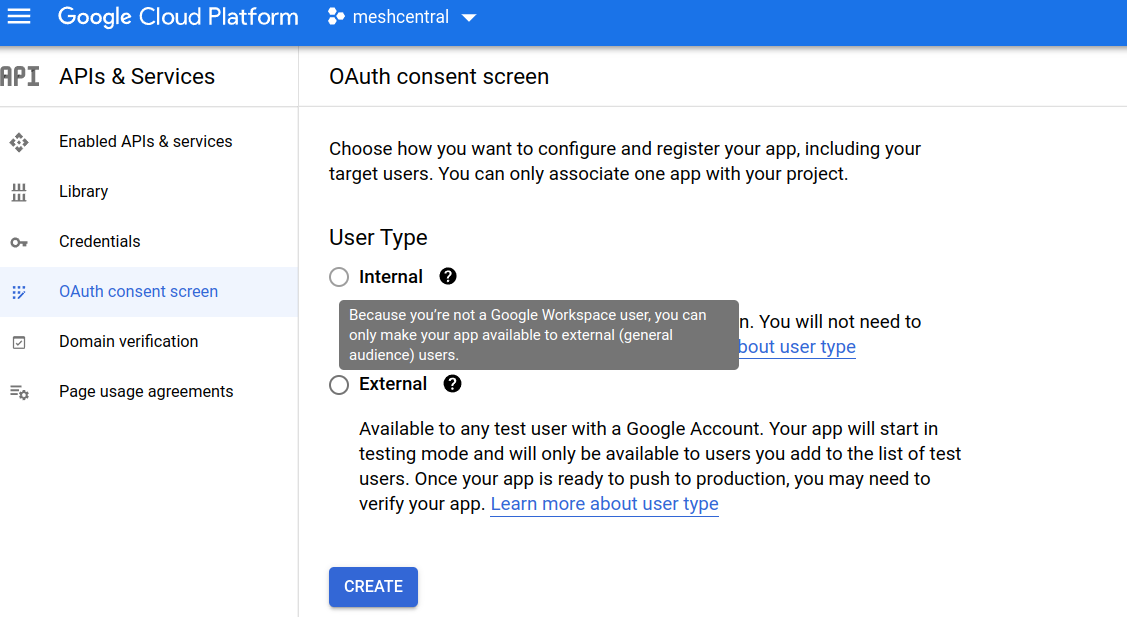
Click on the "OAuth Consent Screen" link, Under "APIs and Services" from the left hand menu:
If you have a Google Workspace account, you will have the option to choose "Internal" application and skip the next steps. If not, you will be required to provide Google with information about why you want access, as well as verifying domain ownership.

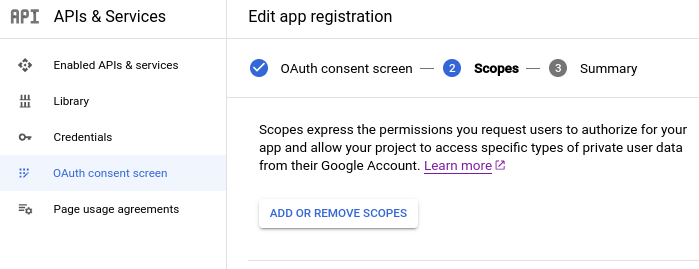
Add the Gmail address under which you have created this project to the fields labelled ‘User support email’ and ‘Developer contact information’ so that you will be allowed for authentication. After that, you will want to add a scope for your app, so that your token is valid for gmail:
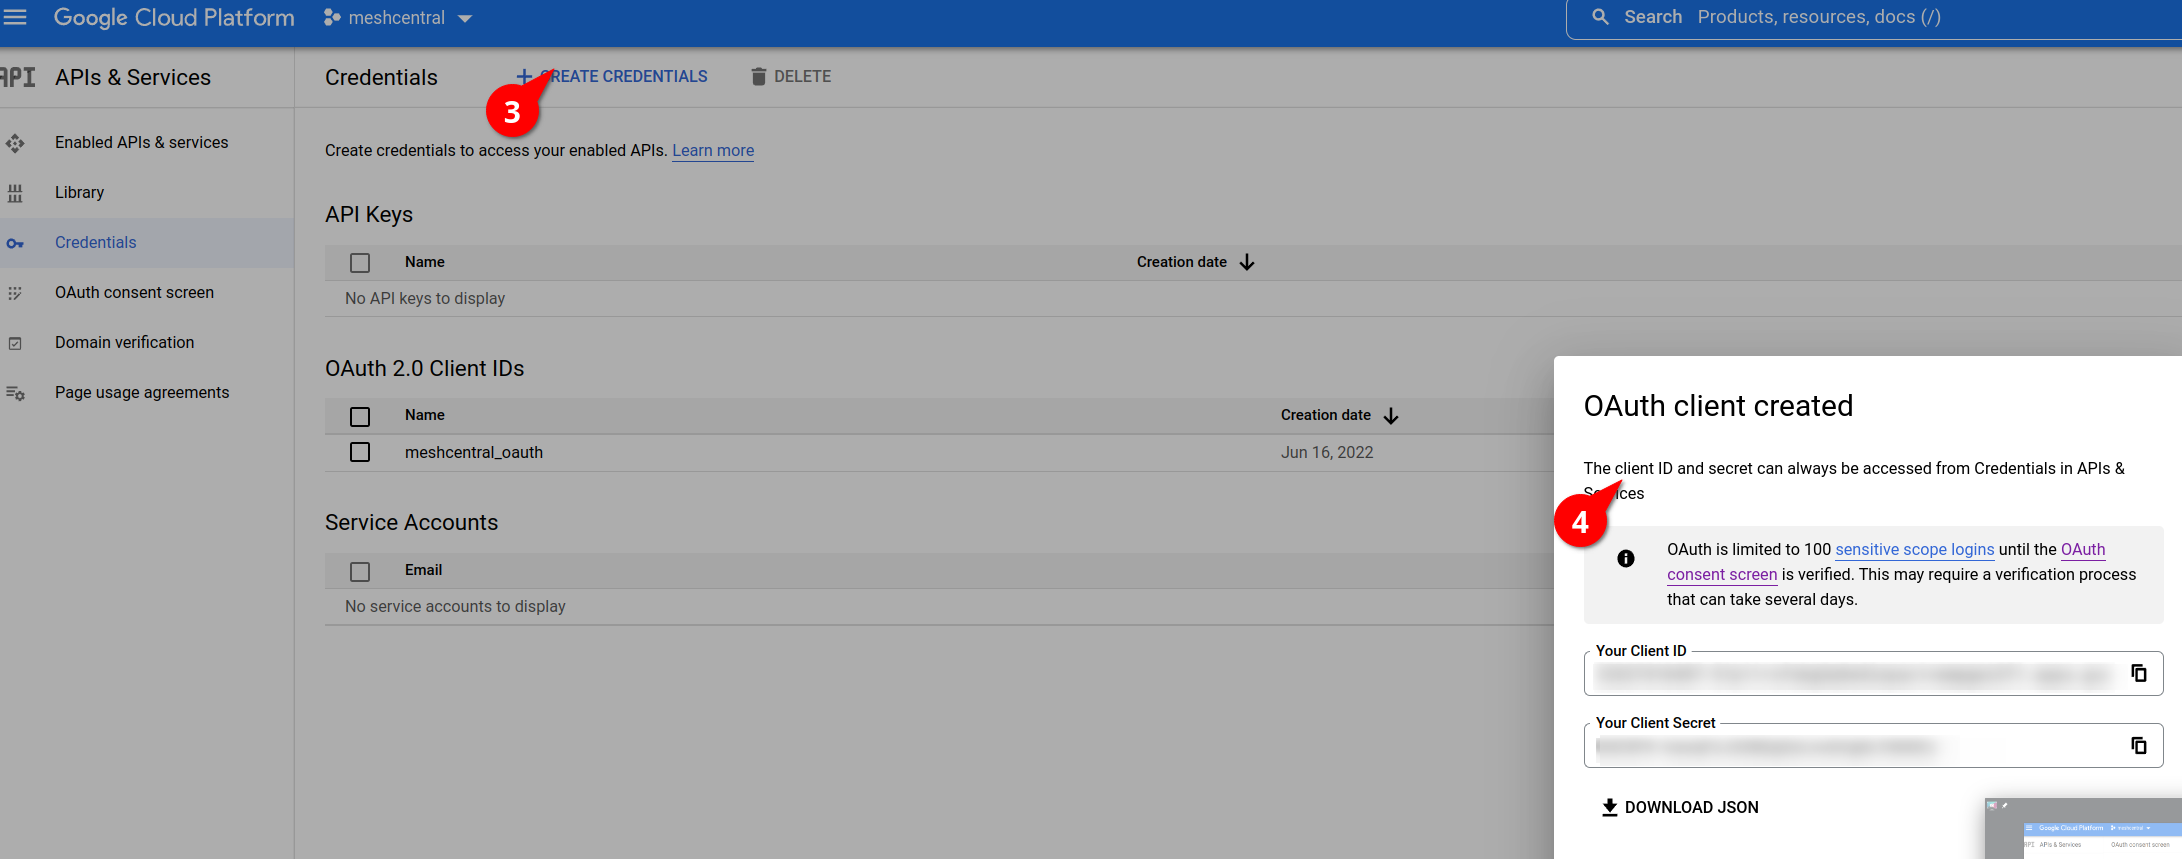
Once this is complete, the next step will be to add credentials.
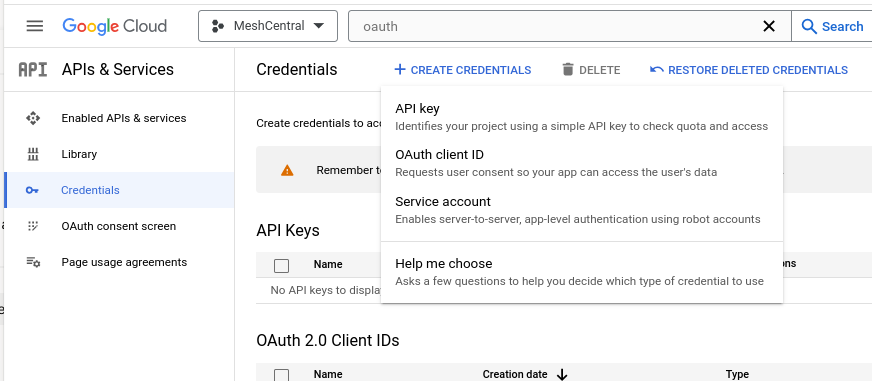
Choose OAuth Client
You will obtain a Client ID and a Client secret once you've completed the process. Be sure to store the secret immediately, as you won't be able to retreive it after you've dismissed the window.
Next, you will need to visit the Google OAuth Playground:
https://developers.google.com/oauthplayground
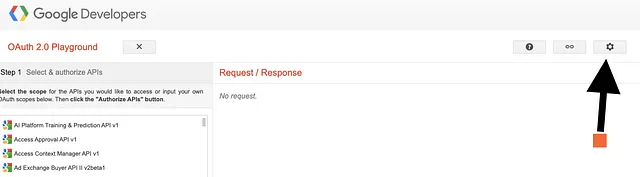
Enter your Client ID and secret from the last step. On the left side of the page, you should now see a text box that allows you to add your own scopes. Enter https://mail.google.com and click Authorize API.
You will need to follow the instructions provided to finish the authorization process. Once that is complete, you should receive a refresh token. The refresh token, Client ID and Client Secret are the final items we need to complete the SMTP section of our config.json. It should now look something like this:
"smtp": {
    "host": "smtp.gmail.com",
    "port": 587,
    "from": "my@googleaccount.com",
    "auth": {
      "clientId": "<YOUR-CLIENT-ID>",
      "clientSecret": "<YOUR-CLIENT-SECRET>",
      "refreshToken": "<YOUR-REFRESH-TOKEN>"
    },
    "user": "noreply@authorizedgooglealias.com",
    "emailDelaySeconds": 10,
    "tls": false,
    "verifyEmail": true
  }
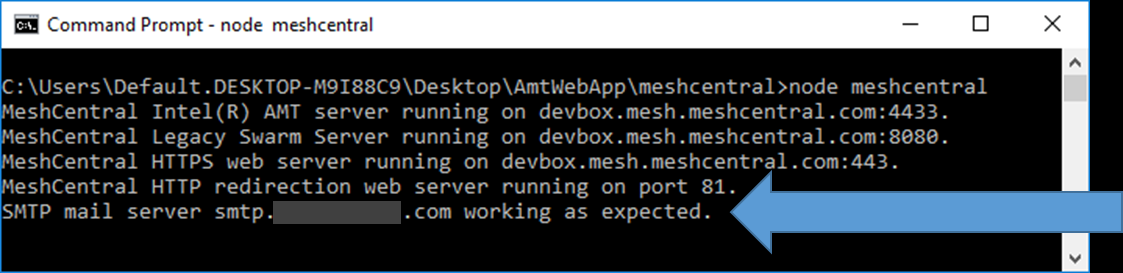
Regardless of what SMTP account is used, MeshCentral will perform a test connection to make sure the server if working as expected when starting. Hence, the user will be notified if Meshcentral and SMTP server has been configured correctly as shown below.
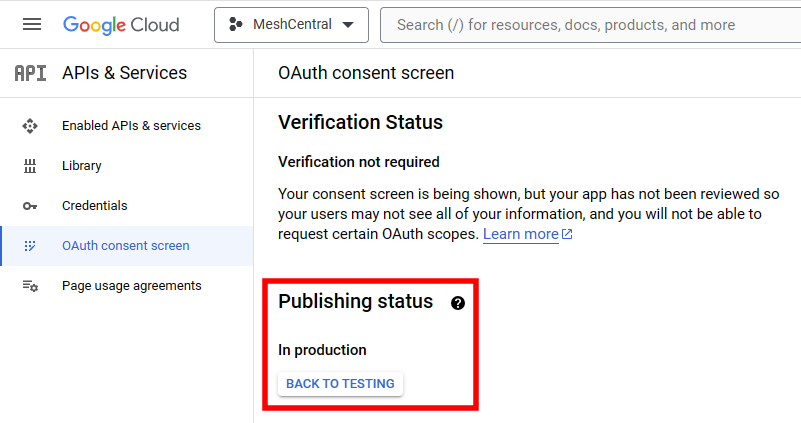
After successfully configuring the Gmail SMTP server, switch the OAuth 'Publishing Status' from Testing to In Production. This step prevents the need for frequent refresh token generation. Verification of your project isn't required to make this change.
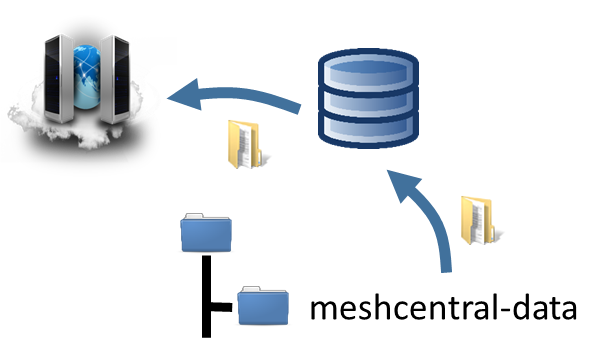
Database
A critical component of MeshCentral is the database. The database stores all of the user account information, groups and node data, historical power and event, etc. By default MeshCentral uses NeDB (https://github.com/louischatriot/nedb) that is written entirely in NodeJS and is setup automatically when MeshCentral is installed with the npm tool. The file “meshcentral.db” will be created in the “meshcentral-data” folder when MeshCentral is first launched. This database works well for small deployments scenarios.
Besides NeDB, MeshCentral fully supports MongoDB for larger deployments or deployments that require robust reliability or load-balancing. In this section we will see look at how to export and import the database file with a JSON file and how to configure MongoDB.
Database Export
User could use a practical approach to migrate from NeDB to MongoDB, by exporting the entire content of the existing NeDB into JSON file, setup the new MongoDB and import that JSON file to create the schemas in MongoDB.
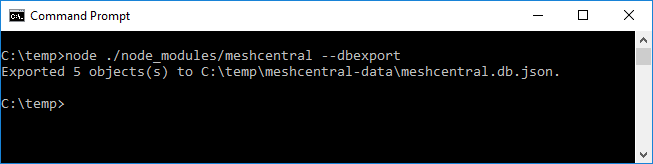
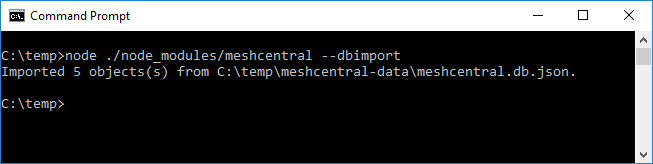
To export the database, stop the MeshCentral server and run the server again with “--dbexport” and a JSON file called “meshcentral.db.json” will be created in the “meshcentral-data” folder as shown below.
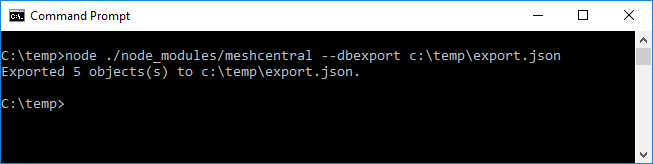
Alternatively, user can also specify the full export path for the JSON file as shown below.
Database Import
Importing the MeshCentral database is useful when transitioning between database softwares (NeDB to/from MongoDB) or when importing the database from MeshCentral1 via migration tool.
Important
Importing a JSON file will overwrite the entire content of the database. A starting empty database is recommended.
When you are ready to import a JSON file into the database, run meshcentral with “--dbimport" as shown below. If path is not specified, the application will default to use “meshcentral.db.json” that is in “meshcentral-data” folder.
Alternatively, user can specify the full path of the import JSON as shown below.

Viewing the Database
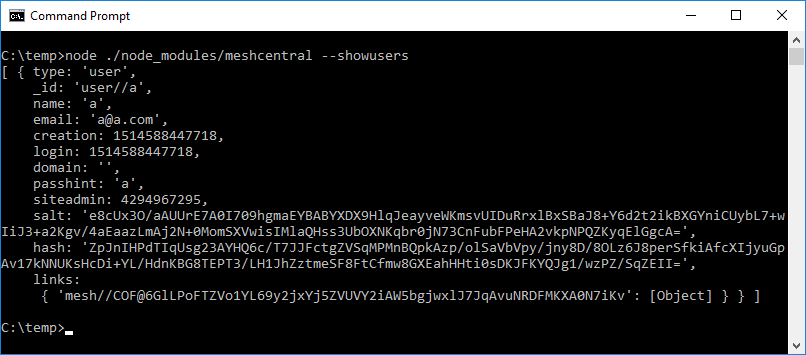
For debugging purposes, Meshcentral allow users to have quick preview of certain frequently accessed data in the database with the following options:
| Option | Description |
|---|---|
| --showusers | List of all users in the database. |
| --showmeshes | List of all meshes in the database. |
| --shownodes | List of all nodes in the database |
| --showevents | List all events in the database |
| --showpower | List all power events in the database. |
| --showall | List all records in the database. |
For example, you can show the list of users with the “--showusers"
MongoDB Setup
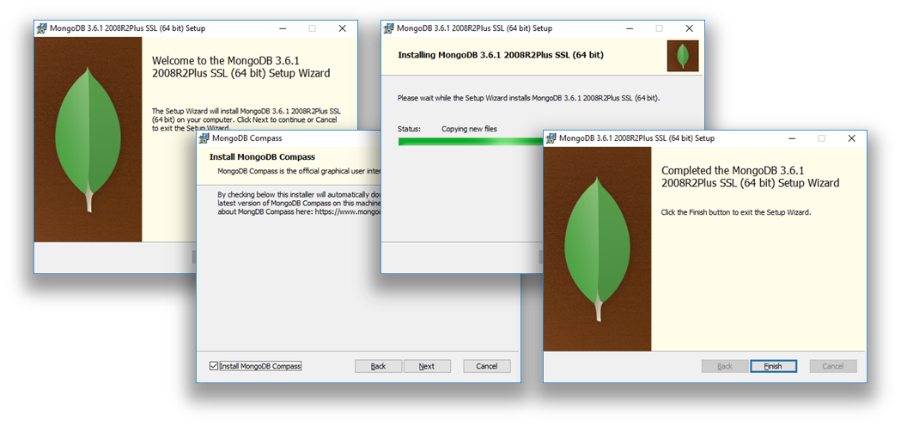
MongoDB is useful when setting up MeshCentral for two or more peer servers given that all peer servers much have access to the same database. NeDB and MongoDB have similar access interfaces hence the DB migration from one to the other is straight forward. Installing MongoDB depends on its host OS so do check for available download options at mongodb.com. In this guide, we will focus on the 64-bit windows with SSL support installer.
After completing the installation step,
- Stop any instance of Meshcentral that is running locally or in any machine
- Start a terminal or Windows Command prompt (CMD),
- Create a folder “c:\data\db”
-
Go to the MongoDB bin folder and run “mongod --bind 127.0.0.1”.
This execute the database engine and store the database data in the default location “/data/db” path and bind a loopback on the local port “127.0.0.1”.
Note: Refer to MongoDB documentation to allow database to run in the background or experiment with alternate configurations.
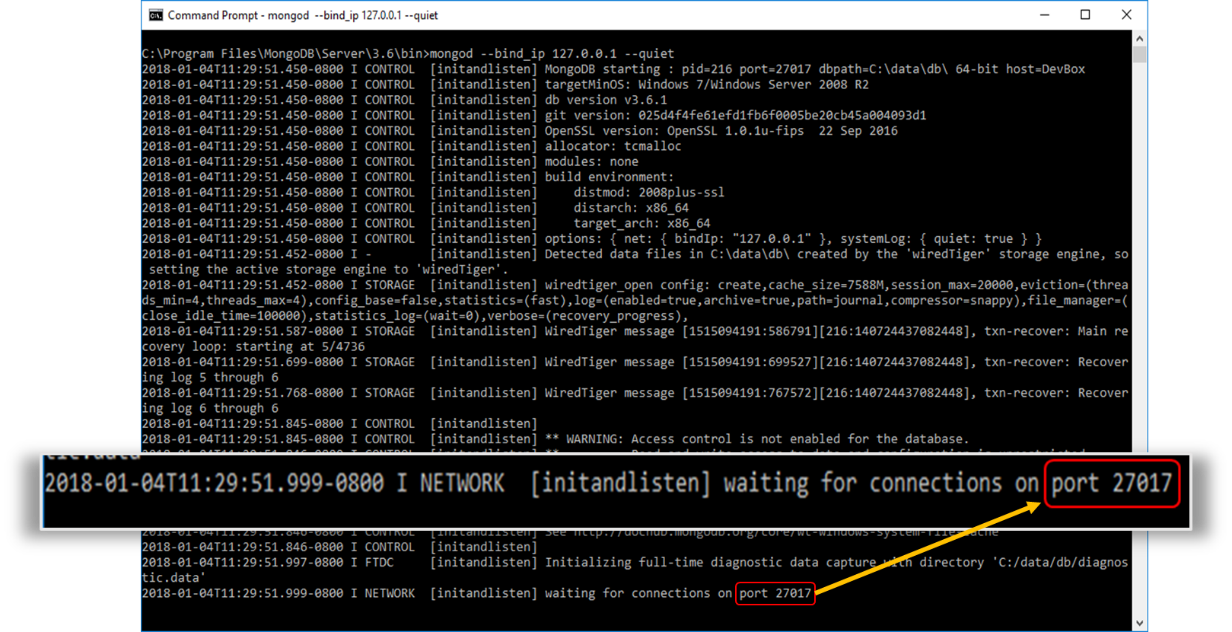
Note: Upon successful execution, MongoDB will wait for connections on its default port 27017.
-
Now run MeshCentral with the command below, it will tell Meshcentral to connect to MongoDB and use “meshcentral” DB. MongoDB will create this DB if it does not exist.
node meshcentral --mongodb mongodb://127.0.0.1:27017/meshcentral
-
Alternatively, to transition an existing meshcentral DB from NeDB and to MongoDB, just run the command below:
node meshcentral --dbexport node meshcentral --mongodb mongodb://127.0.0.1:27017/meshcentral --dbimport node meshcentral --mongodb mongodb://127.0.0.1:27017/meshcentral -
We recommend the user to include MongoDB configuration into the server’s configuration “config.json” to avoid specifying the “--mongodb" each time MeshCentral is executed as shown below
{
  "settings": {
    "mongodb": "mongodb://127.0.0.1:27017/meshcentral",
    "mongodbcol": "meshcentral"
  }
}
Note: By default, MeshCentral will create a single collections called “meshcentral” in the specified database. If user want to specify a different collection name, use “--mongodbcol" or “mongodbcol” for settings like shown above.
If you are using MongoDB with authentication, you can change the URL a little to add the username and password, for example:
mongodb://username:password@127.0.0.1:27017/meshcentral
You can also provide extra connection parameters like this:
mongodb://username:password@127.0.0.1:27017/meshcentral?authMechanism=MONGODB-CR&authSource=db
Running State-less
By default, MeshCentral will read its configuration information from the “meshcentral-data” folder. The most important file in that folder being the “config.json” file, but the folder also contains certificates, branding images, terms of service and more.
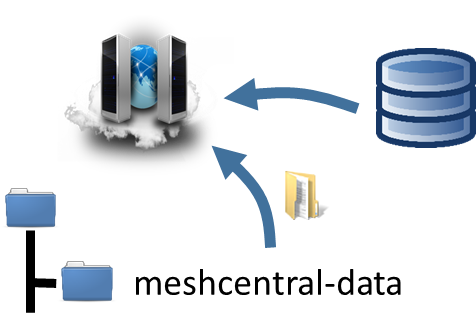
After the configuration is read, MeshCentral will connect to its database and continue to start the server. For most user’s this is a perfectly acceptable way to setup the server. However, in some cases, it’s advantageous to setup the server “state-less”. That is, there is no local configuration files at all and everything is in the database. Two examples of this would be when running MeshCentral is a Docker container where we don’t want the container to have any state or for compliance with security specifications where the database is “encrypted at rest”. In this cases, we will load the configuration files into the database and MeshCentral will only be told how to connect to the database.
When loading configuration information into the database, MeshCentral requires that a configuration file password be used to encrypt the configuration files in the database. This provides an additional layer of security on top of any authentication and security already provided by the database, if such security has been setup.
To make this happen, we will be using the following command line options from MeshCentral:
| Command | Description |
|---|---|
| --configkey (key) | Specifies the encryption password that will be used to read or write the configuration files to the database. |
| --dblistconfigfiles | List the names and size of all configuration files in the database. |
| --dbshowconfigfile (filename) | Show the content of a specified filename from the database. --configkey is required. |
| --dbdeleteconfigfiles | Delete all configuration files from the database. |
| --dbpushconfigfiles '*' or (folder path) | Push a set of configuration files into the database, removing any existing files in the process. When * is specified, the “meshcentral-data” folder up pushed into the database. --configkey is required. |
| --dbpullconfigfiles (folder path) | Get all of the configuration files from the database and place them in the specified folder. Files in the target folder may be overwritten. --configkey is required. |
| --loadconfigfromdb (key) | Runs MeshCentral server using the configuration files found in the database. The configkey may be specified with this command or --configkey can be used. |
Once we have MeshCentral running as expected using the “meshcentral-data” folder, we can simply push that configuration into the database and run using the database alone like this:
node ./node_modules/meshcentral --dbpushconfigfiles '*' --configkey mypassword

node ./node_modules/meshcentral --loadconfigfromdb mypassword --mongodb "mongodb://127.0.0.1:27017/meshcentral"
This first line will load many of the “meshcentral-data” files into the database. At this point, we can back up the “meshcentral-data” folder and remove it. Then run the second line to start the server. Here we use MongoDB, but if one uses NeDB, the “meshcentral.db” file in the “meshcentral-data” folder will still be needed.
Note that MeshCentral does not currently support placing a Let’s Encrypt certificate in the database. Generally, one would use a reverse proxy with Let’s Encrypt support and TLS offload in the reverse proxy and then run MeshCentral in state-less mode in a Docket container.
Commandline Options
In general, doing --option value is the same as adding "option": value in the settings section of the config.json.
Here are the most common options found by running meshcentral --help
Run as a background service
   --install/uninstall               Install MeshCentral as a background service.
   --start/stop/restart              Control MeshCentral background service.

Run standalone, console application
   --user [username]                 Always login as [username] if account exists.
   --port [number]                   Web server port number.
   --redirport [number]              Creates an additional HTTP server to redirect users to the HTTPS server.
   --exactports                      Server must run with correct ports or exit.
   --noagentupdate                   Server will not update mesh agent native binaries.
   --nedbtodb                        Transfer all NeDB records into current database.
   --listuserids                     Show a list of a user identifiers in the database.
   --cert [name], (country), (org)   Create a web server certificate with [name] server name.
                                     country and organization can optionally be set.

Server recovery commands, use only when MeshCentral is offline.
   --createaccount [userid]          Create a new user account.
   --resetaccount [userid]           Unlock an account, disable 2FA and set a new account password.
   --adminaccount [userid]           Promote account to site administrator.
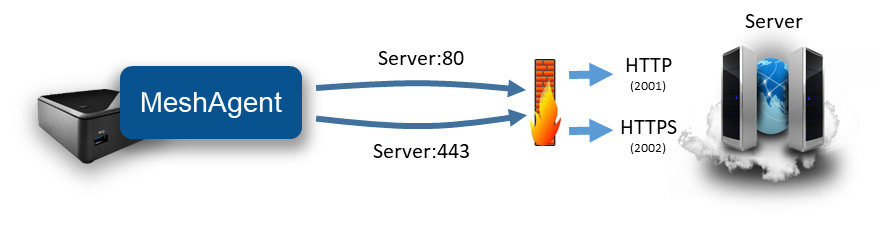
TLS Offloading
A good way for MeshCentral to handle a high traffic is to setup a TLS offload device at front of the server that takes care of doing all the TLS negotiation and encryption so that the server could offload this. There are many vendors who offer TLS or SSL offload as a software module (Nginx* or Apache*) so please contact your network administrator for the best solution that suits your setup.
As shown in the picture below, TLS traffic will come from the Internet and security will be handled by a device ahead of the server and MeshCentral only has to deal with TCP connections.
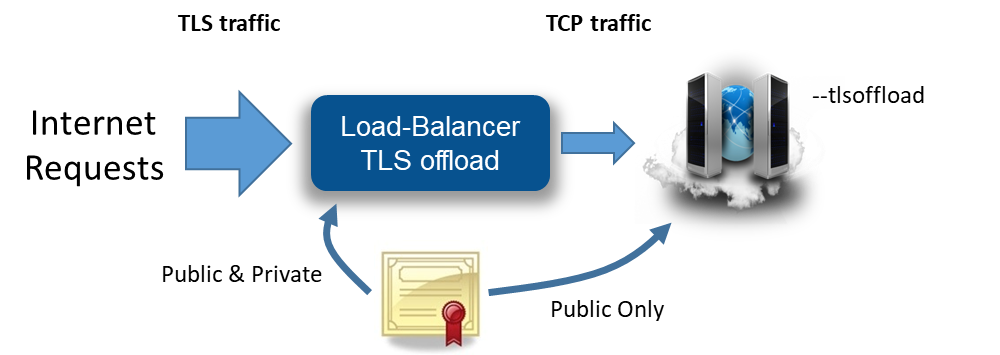
To make this work, it is important the server is setup with “--tlsoffload”. This indicates the server that TLS is already being taken care of and MeshCentral does not have to deal with it. MeshCentral will continue to listen to port 80, 443 and 4433.
However, incoming port 443 (main web port) and 4433 (Intel® AMT MPS port) will not have TLS but MeshCentral will still put many HTTPS flags in its responses on port 443. By default, if a user accesses http://127.0.0.1:443 without TLS offloader setting, the browser is expected to display warnings. To make this work, TLS offloader device’s ports and functions should be configured correctly like below
| Port | Function Description |
|---|---|
| 80 | Directly forwards port 80 to MeshCentral port 80 |
| 443 | Handle TLS using a web certificate and forward to MeshCentral port 443 |
| 4433 | Handle TLS using MPS certificate and forward to MeshCentral port 4433 |
If possible, port 443 should be configured with a legitimate trusted certificate and the public part of the certificate named as “webserver-cert-public.crt” must be placed inside of “meshcentral-data” folder of the server. When the server is executed in tlsoffload mode, only the public part of the web certificate is used by the server.
For Intel® AMT MPS port 4433, the certificate files “mpsserver-cert-public.crt” and “mpsserver-cert-public.key” must be copied from the “meshcentral-data” folder and loaded into the TLS offload module.
Note: Please consult the TLS offloader user manual from the respective vendor to configure TLS offloading feature correctly.
Let’s Encrypt support
MeshCentral makes use of HTTPS to authenticate and encrypt management traffic over the network. By default, a self-signed certificate is used for the MeshCentral HTTPS server. That certificate is not trusted by browsers and so, you get a warning message when visiting the web site. You can solve this but obtaining a free trusted certificate from Let’s Encrypt (https://letsencrypt.org/). There are some limitations and so, it’s best to get familiar with this service before starting. You will also need a valid domain name that you own and that points to your MeshCentral server.
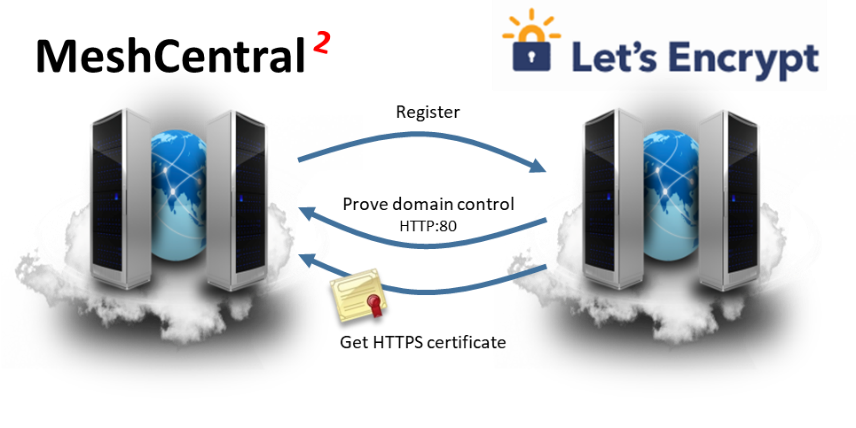
Before moving forward with this section, make sure your MeshCentral server is working correctly, has a domain name pointing to it and that the HTTP redirection server on port 80 is enabled and working. MeshCentral’s HTTP port 80 server will be used in the process to prove to Let’s Encrypt that we have control over the domain. At any point, you may try to use https://letsdebug.net/ to see if your domain is setup correctly and/or debug any issues. When ready, add the “letsencrypt” section to the config.json file like this:
{
  "settings": {
    "RedirPort": 80,
  },
  "letsencrypt": {
    "email": "myemail@myserver.com",
    "names": "domain1.com,domain2.com",
    "rsaKeySize": 3072,
    "production": false
  },
}
The only mandatory field is the email address, please enter a valid one.
The names section is a list of domain names the requested certificate will be valid for. This must be a list of DNS names that are already pointing to your server. It’s important to understand you are not requesting these DNS names, rather, Let’s Encrypt will makes requests to prove control over all of these domain name before issuing the certificate. All the domain names you enter must point to the server and HTTP port 80 must be reachable over the internet. If you don’t specify names, the default MeshCentral certificate name is used, that is the configured “--cert [name]”.
The RSA key size can only be 2048 or 3072, with the default being 3072. This is the number of bit used for the RSA key in the certificate. Bigger is more secure, but takes more time to compute.
Lastly the production key, by default this is false. When set to false, MeshCentral will query the Let’s Encrypt staging server for a certificate. It’s highly recommended to try this first and make sure everything works before getting a real certificate. Keep production to false, run thru the process at least once and make sure everything works. You will get a new certificate installed on the HTTPS server signed by a staging Let’s Encrypt certificate authority.
The Let’s Encrypt certificates and files will be created in the “meshcentral-data” folder. Make sure to keep regular backups of the “meshcentral-data” folder and all sub-folders.

Once you placed the “letsencrypt” section in config.json, restart the server. The request to the Let’s Encrypt server may take a few minutes to a few hours. It’s best to have your DNS server name pointing to your server for over a day before doing this. Once the new certificate is received, the server will automatically restart and browsing to HTTPS on your server will show the new certificate. Here is what it looks like on FireFox:
If you successfully setup a Let’s Encrypt certificate using the Let’s Encrypt staging server (“production”: false) and everything looks good, stop the server, remove the “letsencrypt” folder in “meshcentral-data”, change production to “true” and start the server again. You should get a real certificate in a few minutes to a few hours. MeshCentral will automatically renew the certificate a few days before it expires. The MeshCentral self-signed certificate will still be present in the “meshcentral-data” folder, this is normal and there is no need to manually copy the Let’s Encrypt certificate to the “meshcentral-data” folder. If something goes wrong with the Let’s Encrypt certificate, the server will fall back to using the self-signed one.
Note
Please be patient with Let’s Encrypt certificate requests and make sure you correctly get a staging certificate before setting production to true.
If Let’s Encrypt works for you, please consider donating to them as they provide a critical service to the Internet community.
Server IP filtering
For improved security, it’s good to limit access to MeshCentral with IP address. For example, we want to allow mesh agents and Intel AMT computers to connect from anywhere, but whitelist IP address for users that we allow to access MeshCentral.
MeshCentral provides IP filtering option in the config.json file for each domain. For an example, we can set IP address whitelist for the default domain like as shown below.
    {
        "domains": {
            "": {
                "userallowedip" : "1.2.3.4,1.2.3.5",
            }
        }
    }
IP addresses are separated by a comma. As a result, only users coming these IP addresses will be able to see the server’s login page as illustrated below. Other IP addresses will be blocked effectively.

Note: When IP address whitelist is effective, Mesh Agent connection from any IP address will be not affected.
You can also use files for IP lists
"userAllowedIp": "file:userallowedips.txt",
"userBlockedIp": "file:userblockedips.txt",
"agentAllowedIp": "file:agentallowedips.txt"
Place the file in the meshcentral-data folder.
All the lines that start with a number or : will be used, everything else is ignored. So, you can put comments anyway you like, but probably best to start then with a # or something to make it clear.
# My list of blocked IP's
185.101.70.0/24
185.46.85.0/24
37.9.44.0/24
37.9.45.0/24
5.189.205.0/24
5.189.206.0/24
5.189.207.0/24
5.62.153.0/24
5.62.156.0/24
5.62.158.0/24

# One more list
5.8.44.0/24
5.8.45.0/24
5.8.46.0/24
79.110.28.0/24
79.110.31.0/24
91.204.14.0/24
95.181.218.0/24
95.85.81.0/24
Embedding MeshCentral
One interesting way to use MeshCentral is to embed its features into another web site. In other words, certain feature of MeshCentral can be selectively embedded into another website such as Remote Desktop or File Transfer.
This allows another site to take care of the user accounts and business processes while MeshCentral takes care of remote management. In the example below, a user logs into an existing web site and received a page with MeshCentral remote desktop embedded into it.
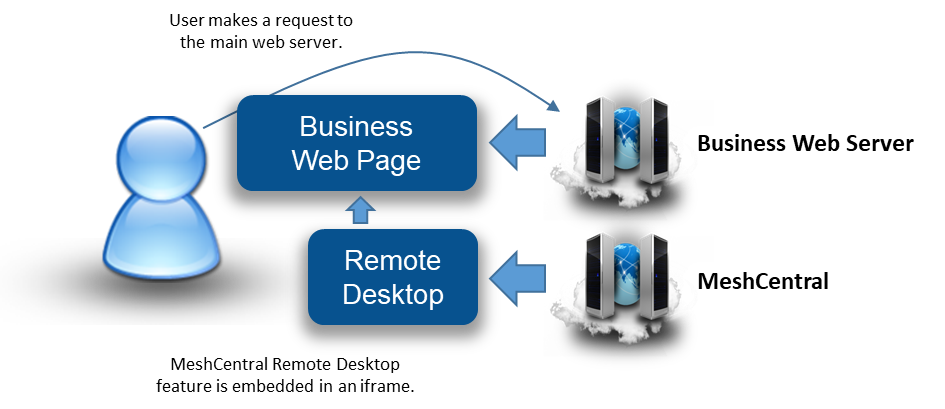
To make this work, a following key alignment is required:
1. When a user requests the business website, the business web server must return the user a web page containing an iframe with a URL that points to the MeshCentral server.
2. The URL must contain both a login token and embedding options. The login token tells MeshCentral under what MeshCentral account this request should be made.
3. The login token replaces the login screen of MeshCentral. Then, the embedding options can be used to specify no page title, header and footer to be displayed. This way, the page given by MeshCentral will fit nicely into the iframe.
In this section we will review both the login token and embedding options mentioned above.
Login Token
With MeshCentral, it’s possible to login to the main web page without even seeing the login screen. Of course, you can do this by specifying “--nousers" or “--user admin” when you run the server, but these approach are not secure as it removes user authentication for those accessing the server.
With login tokens feature, a token can be generated to be used for a short time to login and skip the login page. This is perfect for embedding MeshCentral usages into other web site and probably for other applications.
To enable this feature, configure config.json file to allow login tokens.
{
  "settings": {
    "allowLoginToken": true,
    "allowFraming": true
  }
}
Set both allowLoginToken and allowFraming to ‘true’ to use login tokens along with framing MeshCentral within another web page.
Next, create a token. Execute MeshCentral with the “--logintoken [userid]” switch and userid value with the example below:

The “userid” is actually a combination of three values - user, domain, and username in a single string “user/domain/username”. The example above is using a default domain which is empty hence, the userid will be just “user//admin” to request for login token. Domains are only used if the server in multi-tenancy mode as discussed in previous chapters.
The resulting hashed base64 encoded blob can be used as a login token for 1 hour. Simply add the “?login=” followed by the token value generated to the URL of the webserver. For an e.g. https://localhost/?login=23tY7@wNbPoPLDeXVMRmTKKrqVEJ3OkJ. The login page is expected to be skipped and automatically login the user admin. This is just a manual attempt to token based login.
Now, to have this work seamlessly with a different website, we should generate a login token key. A token key can be used to generate login tokens whenever needed for MeshCentral. Generate this key with “--loginTokenKey" switch as shown below

The generated masker key must be placed in a secure location within the business website.

As illustrated above, we see the business site using the token key to generate a login token and embed it into the response web page. The user’s browser then loads the iframe that includes both the URL with the login token for MeshCentral. MeshCentral can then verify the token and allow the web page to load as expected.
Embedding Options
There are multiple options available for user to explicitly choose the features that will be loaded from MeshCentral to the business website. The argument in the in the URL can dictate which web page should display and how. The three embedding URL arguments are Viewmode, Hide and Node.
| Embedding Options / URL Argument | Description | "Values Note: For values 10 and above, a node identifier must be specified." |
|---|---|---|
| viewmode | "Indicates the information to show. This is an integer value, possible values are:" |
"1 = Devices tab 2 = Account tab 3 = Events tab 4 = Users tab (Site admins only) 5 = Server files tab 10 = Device general information 11 = Device remote desktop 12 = Device terminal 14 = Device Intel AMT console. 15 = Device Mesh Agent console |
| hide | "Indicates which portion of the web page to hide. This is a bitmask integer hence it will need the sum of values. For .e.g.: To hide all of the values, add 1+2+4+8 and use 15 as the value. |
1 = Hide the page header 2 = Hide the page tab 4 = Hide the page footer 8 = Hide the page title 16 = Hide the left tool bar 32 = Hide back buttons |
| node | Optional unless Viewmode is set to value of 10 or greater. Indicates which node to show on the screen, For example, if we want to embed the remote desktop page for a given node and hide the header, tabs, footer and page title, we could have this URL: https://localhost/?node=UkSNlz7t...2Sve6Srl6FltDd&viewmode=11&hide=15" |
Node or NodeID is a long base64 encoded SHA384 value |
Note: Typically, the URL for the website is followed by “?” then a set of name=value pairs separated by “&”.
Based on the URL https://localhost/?node=UkSNlz7t...2Sve6Srl6FltDd&viewmode=11&hide=15 , the nodeID starts with “UkSNlz7t”. We shortened the value in this example, but it’s normally a long base64 encoded SHA384 value. The Viewmode set to 11 which is the remote desktop page and Hide set to 15 to hide everything. Hence the user may see as illustrated below.
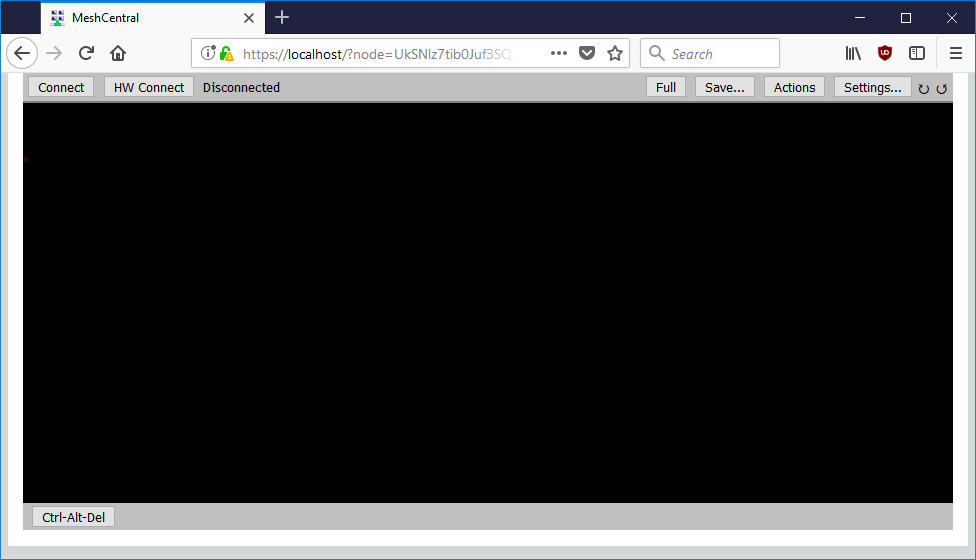
Only the remote desktop viewer will be displayed embedded within an iframe.
Note: User must set “allowFraming” to true in the config.json of the server. This is in addition to the Node, Viewmode and Hide arguments, the login token must be specified to add complex features into another website.
Server port aliasing
In some cases, you may be setting up a server on a private network that uses non-standard ports, but use a router or firewall in front to perform port mapping. So, even if the server privately uses non-standard ports, the public ports are the standard ports 80 and 443. You have to tell MeshCentral to bind to private ports but pretend it’s using the other standard ports when communicating publicly. To make this work, MeshCentral supports port aliasing.
For example you can run:
node meshcentral --redirport 2001 --port 2002 --aliasport 443
Here, the server binds the HTTP and HTTPS ports to 2001 and 2002, but the server will externally indicate to MeshAgents and browsers that they must connect to port 443.
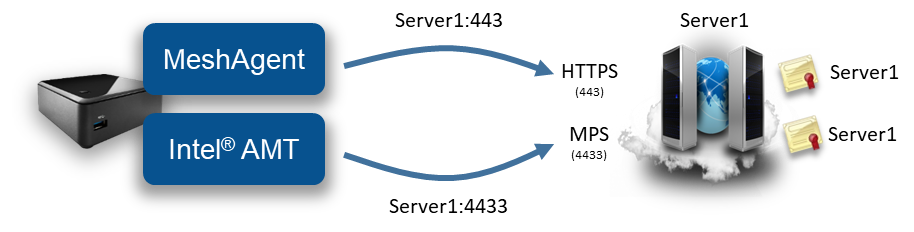
In a different situation, you may want to setup a server so that both Mesh Agents and Intel AMT connect back to the server on port 443. This is useful because some corporation have firewalls that restrict outgoing connections to only port 80 and 443. By default, MeshCentral will be setup to have MeshAgents connection on port 443 and Intel AMT on port 4433.
In the following picture we have a usual server running with:
node meshcentral --cert Server1 --port 443 --mpsport 4433
We can setup the server so that MeshAgent and Intel AMT will connect on port 443 of two different IP address or names like this:
node meshcentral --cert Server1 --mpscert Server2
--port 443 --mpsport 4433 --mpsaliasport 443
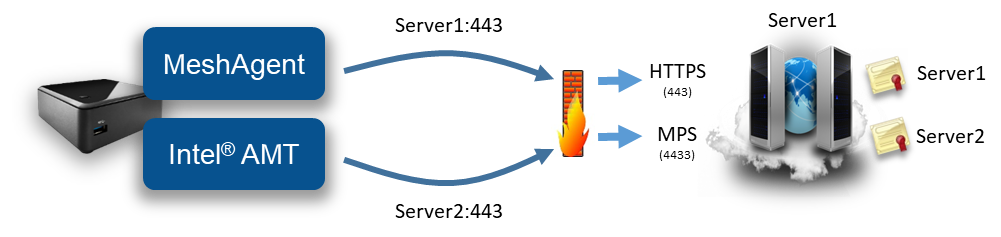
In the second example, the server on the right is running HTTPS on port 443 and MPS on port 4433 as usual, but the MPS is now presenting a certificate that has the name “Server2” on it. The server will also configure Intel AMT CIRA to connect to “Server2:443”.
A router or firewall that is located in front of the MeshCentral server needs to be configured correctly to forwarding:
Server1:443 -> 443 on MeshCentral
Server2:443 -> 4433 on MeshCentral
The routing of IP and ports by the firewall shown on the picture must be configured separately from MeshCentral using separate software. Typically, routers or firewalls have the proper controls to configure this type of traffic routes.
Web relay using DNS names and multiple web relays
MeshCentral has a web relay feature that allows a user to access remote web sites thru the MeshCentral server without having to install MeshCentral Router. Web relay also allow you to use an alternate DNS name instead of a different web relay port which has a few advantages. You can also use multiple alternate DNS names which can be used at the same time to provide users with many HTTP/HTTPS relays.
Video Walkthrus
Device Groups with Relay Agent
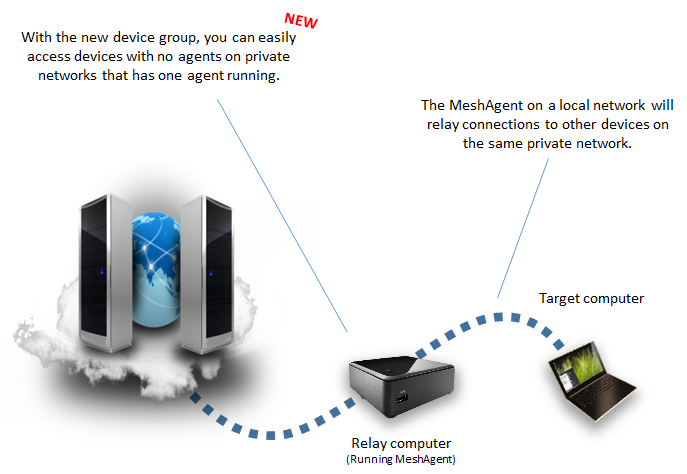
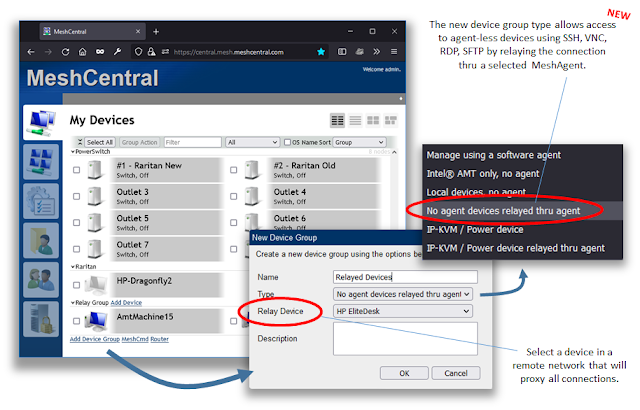
MeshCentral supports the local device group allowing devices that do not have an agent to be managed thru MeshCentral with regular SSH, SFTP, RDP, VNC protocols. Until now, the MeshCentral server had to be in LAN or Hybrid modes to support his device group and the managed devices had to be on the same network as the MeshCentral server. Starting with v1.0.11, users can create a local device group specifying a MeshAgent as a relay. This makes it possible to manage agent-less devices from anywhere on the Internet even if the server is in WAN mode. Simply install a single device with a MeshAgent on a network and create a local device group with that device as the relay.
To enable SSH support, add this line to the domain section of your config.json:
"ssh": true
Video Walkthru
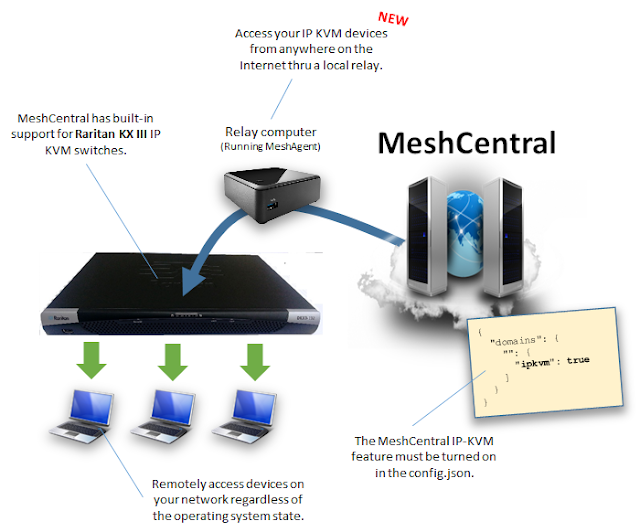
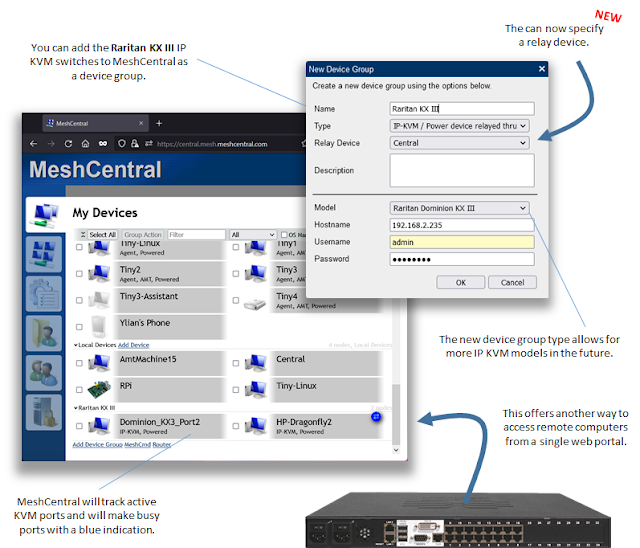
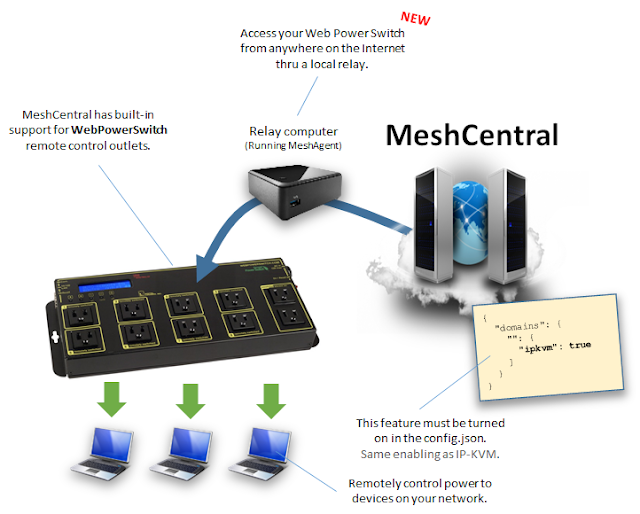
Raritan and WebPowerSwitch with Relay
In addition to local device groups, the IP-KVM/Power switch device group was also improved to support a MeshAgent as a relay. This is big news for Raritan IP-KVM switch owners as you can now monitor your IP-KVM ports and access them remotely from the Internet. The same can be done with WebPowerSwitch allowing full out-of-band remote access to devices from anywhere in the world.
NGINX Reverse-Proxy Setup
Video Walkthru
Sometimes it’s useful to setup MeshCentral with a reverse-proxy in front of it. This is useful if you need to host many services on a single public IP address, if you want to offload TLS and perform extra web caching. In this section we will setup NGINX, a popular reverse-proxy, in front of MeshCentral. NGNIX is available at: https://www.nginx.com/

In this example, we will:
- MeshCentral on non-standard ports, but alias HTTPS to port 443.
- NGINX will be using standard ports 80 and 443.
- We will have NGINX perform all TLS authentication & encryption.
- MeshCentral will read the NGINX web certificate so agents will perform correct server authentication.
- NGINX will be setup with long timeouts, because agents have long standard web socket connections.
Note
With SELinux, NGINX reverse proxy requires 'setsebool -P httpd_can_network_relay 1' Caution: httpd_can_network_relay only allows certain ports Confirm you are using ports from this subset in MeshCentral If you want to use a different port then you will need to add it to http_port_t
Let’s get started by configuring MeshCentral with the following values in config.json:
{
  "settings": {
    "Cert": "myservername.domain.com",
    "Port": 4430,
    "AliasPort": 443,
    "RedirPort": 800,
    "AgentPong": 300,
    "TlsOffload": "127.0.0.1"
  },
  "domains": {
    "": {
      "certUrl": "https://127.0.0.1:443/"
    }
  }
}
With this configuration, MeshCentral will be using port 4430 instead of port 443, but because “TlsOffload” is set, TLS will not be performed on port 4430. The server name is set to “myservername.domain.com”, so that is the name that MeshCentral will give to agents to connect to. Also, the alias port is set to 443. So agents will be told to connect to “myservername.domain.com:443”.
The “AgentPong” line instructs the server to send data to the agent each 300 seconds and the agent by default will send data to the server every 120 seconds. As long as NGINX timeouts are longer than this, connections should remain open.
When agents connect, they will see the NGINX TLS certificate on port 443. MeshCentral needs to know about the NGINX certificate so that it can tell the agents this is the correct certificate they should expect to see. So, “certUrl” is used to tell MeshCentral where to get the certificates that agents will see when connecting.
When NGINX forwards connections to MeshCentral, extra X-Forwarded headers will be added to each request. MeshCentral needs to know if these headers can be trusted or not. By setting “TlsOffload” to “127.0.0.1”, MeshCentral is told to trust these headers when requests come from “127.0.0.1”.
In this example, make sure to change “127.0.0.1” to the IP address of NGINX and “Cert” to the external DNS name of the NGINX server.
Next, we need to configure and launch NGINX. Here is an ngnix.conf to get started:
worker_processes 1;

events {
    worker_connections 1024;
}

http {
    # HTTP server. In this example, we use a wildcard as server name.
    server {
        listen 80;
        server_name _;

        location / {
            proxy_pass http://127.0.0.1:800/;
            proxy_http_version 1.1;

            # Inform MeshCentral about the real host, port and protocol
            proxy_set_header X-Forwarded-Host $host:$server_port;
            proxy_set_header X-Forwarded-For $proxy_add_x_forwarded_for;
            proxy_set_header X-Forwarded-Proto $scheme;
        }
    }

    # HTTPS server. In this example, we use a wildcard as server name.
    server {
        listen 443 ssl;
        server_name _;

        # MeshCentral uses long standing web socket connections, set longer timeouts.
        proxy_send_timeout 330s;
        proxy_read_timeout 330s;

        # We can use the MeshCentral generated certificate & key
        ssl_certificate webserver-cert-public.crt;
        ssl_certificate_key webserver-cert-private.key;
        ssl_session_cache shared:WEBSSL:10m;
        ssl_ciphers HIGH:!aNULL:!MD5;
        ssl_prefer_server_ciphers on;

        location / {
            proxy_pass http://127.0.0.1:4430/;
            proxy_http_version 1.1;

            # Allows websockets over HTTPS.
            proxy_set_header Upgrade $http_upgrade;
            proxy_set_header Connection "upgrade";
            proxy_set_header Host $host;

            # Inform MeshCentral about the real host, port and protocol
            proxy_set_header X-Forwarded-Host $host:$server_port;
            proxy_set_header X-Forwarded-For $proxy_add_x_forwarded_for;
            proxy_set_header X-Forwarded-Proto $scheme;
        }
    }
}
As indicated in the comments of this NGINX configuration file, we set timeouts to be really long. We forward HTTP port 80 and HTTPS port 443 to the corresponding ports on MeshCentral. In this example, we happen to use the web certificates that where generated by MeshCentral, but any certificate is ok. We also add extra “X-Forward” headers, this tells MeshCentral information that would normally be hidden by NGINX, like the client’s IP address and more.
Now we are ready to start NGINX and MeshCentral. You should start NGINX first because MeshCentral will try to fetch the certificate from NGINX upon start. When starting MeshCentral, you should see something like this:
MeshCentral HTTP redirection web server running on port 800.
Loaded RSA web certificate at https://127.0.0.1:443/, SHA384: d9de9e27a229b5355708a3672fb23237cc994a680b3570d242a91e36b4ae5bc96539e59746e2b71eef3dbdabbf2ae138.
MeshCentral Intel(R) AMT server running on myservername.domain.com:4433.
MeshCentral HTTP web server running on port 4430, alias port 443.
Notice on the second line, MeshCentral will have loaded the web certificate from NGNIX and display a matching hash. That is it, navigating to port 80 and 443 on NGINX should show the MeshCentral web page and agents should connect as expected.
CIRA Setup with NGINX
We can add on the section above and support reverse proxy for Intel® AMT Client Initiated more Access (CIRA) connecting that come to the server. Normally, CIRA connections come on port 4433 and use TLS.
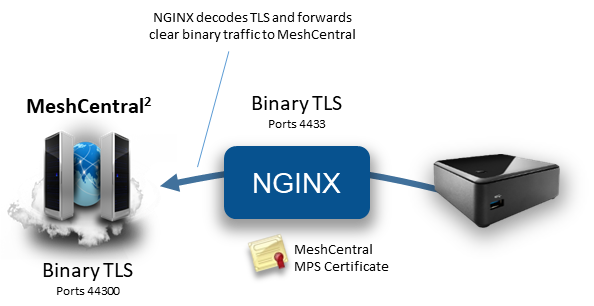
Since CIRA is a binary protocol, care must be taken to configure NGINX to handle the data as a TCP stream instead of HTTP. At the very bottom of the nginx.conf file, we can add the following:
stream {
    # Internal MPS servers, in this case we use one MeshCentral MPS server is on our own computer.
    upstream mpsservers {
        server 127.0.0.1:44330 max_fails=3 fail_timeout=30s;
    }

    # We can use the MeshCentral generated MPS certificate & key
    ssl_certificate mpsserver-cert-public.crt;
    ssl_certificate_key mpsserver-cert-private.key;
    ssl_session_cache shared:MPSSSL:10m;
    ssl_ciphers HIGH:!aNULL:!MD5;
    ssl_prefer_server_ciphers on;

    # MPS server.
    server {
        listen 4433 ssl;
        proxy_pass mpsservers;
        proxy_next_upstream on;
    }
}

NGINX will listen on port 4433, decrypt the connection and forward it to 44330 on the loopback interface. We are going to be used the “mpsserver” certificate that was created by MeshCentral as the TLS server certificate for port 4433. Now, we just have to make a few changes to the MeshCentral config.json file.

{
  "settings": {
    "Cert": "myservername.domain.com"
    "Port": 4430,
    "AliasPort": 443,
    "RedirPort": 800,
    "TlsOffload": "127.0.0.1"
    "MpsPort": 44330,
    "MpsAliasPort": 4433,
    "MpsTlsOffload": true
  },
  "domains": {
    "": {
      "certUrl": "https://127.0.0.1:443/"
    }
  }
}
In this new config.json, we added 3 lines. First, the MeshCentral Management Presence Server (MPS) is now on port 44330. However, the MpsAliasPort value indicates that externally, port 4433 will be used, so we need to configure Intel AMT to connect to port 4433. Lastly, we want to disable TLS support on port 44330 by setting “MpsTlsOffload” to true.
With this configuration, Intel AMT CIRA connections will come in and TLS will be handled by NGINX. With this setup, it’s not possible to configure Intel AMT CIRA to connect using mutual-TLS authentication, only username/password authentication is used.
Traefik Reverse-Proxy Setup
In this section, we will setup MeshCentral with Traefik, a popular reverse proxy software. This section will be much like the previous section setting up NGNIX but with a different software and configuration file. Traefik is open source and available at: https://traefik.io/
This section covers a really simple Traefik configuration. Traefik is capable of a lot more complex configurations.

In this example, we will:
- MeshCentral on non-standard ports, but alias HTTPS to port 443.
- Traefik will be using standard ports 80 and 443.
- We will have Traefik perform all TLS authentication & encryption.
- MeshCentral will read the NGINX web certificate so agents will perform correct server authentication.
First we will start with the MeshCentral configuration, here is a minimal configuration that will work:
{
  "settings": {
    "Cert": "myservername.domain.com",
    "Port": 4430,
    "AliasPort": 443,
    "RedirPort": 800,
    "TlsOffload": "127.0.0.1"
  },
  "domains": {
    "": {
      "certUrl": "https://127.0.0.1:443/"
      "AgentConfig": [ "webSocketMaskOverride=1" ]
    }
  }
}
Note the “agentConfig” line: Because Traefik does not support web socket connections that are not “masked”, we have to tell the Mesh Agents to mask web socket connections using this line. Once set, any new agent will be installed with the web socket masking turned on. Also note that we will be running MeshCentral on port HTTPS/4430 and HTTP/800. However, we also indicate to MeshCentral that HTTPS will really be on port 443 using the “AliasPort” line.
The “TlsOffload” line indicates that MeshCentral should not perform TLS on port 4430. And the “certUrl” line indicates what URL can be used to load the external certificate that will be presented on port 443 in front of MeshCentral.
Now that we have MeshCentral setup, let’s take a look at a sample Traefik configuration file. In this case, we will manually configure the entrypoints, frontends and backends within the Traefik configuration file. There is a basic configuration file for Traefik 1.7:
[global]
  checkNewVersion = false
  sendAnonymousUsage = false

[entryPoints]
  [entryPoints.http]
  address = ":80"
    [entryPoints.http.redirect]
    entryPoint = "https"
  [entryPoints.https]
  address = ":443"
    [entryPoints.https.tls]
      [[entryPoints.https.tls.certificates]]
      certFile = "webserver-cert-public.crt"
      keyFile = "webserver-cert-private.key"

[file]

[backends]
  [backends.backend1]
    [backends.backend1.healthcheck]
      path = "/health.ashx"
      interval = "30s"

    [backends.backend1.servers.server1]
    url = "http://127.0.0.1:4430"
    weight = 1

[frontends]
  [frontends.frontend1]
  entryPoints = ["https"]
  backend = "backend1"
  passHostHeader = true
  [frontends.frontend1.routes]
    [frontends.frontend1.routes.main]
    rule = "Host:myserver.domain.com,localhost"

[api]
  entryPoint = "traefik"
  dashboard = true
The enterPoints section shows we have two entry points, port 80 will be redirected to port 443. Traefik will perform this redirection so MeshCentral will never see port 80 connections. Port 443 will be setup using the given TLS certificates. In this example, we just used the certificate files generated by MeshCentral in the “meshcentral-data” folder. You can use the two certificate files as-is.
The backends section configures one MeshCentral server on port “4430”. Traefik will additionally check the health of the MeshCentral server periodically, every 30 seconds.
The frontends section is what routes the connections coming in the entry points to the backend servers. In this case, the HTTPS entry point is routed to the MeshCentral server is the hostname matches “myserver.domain.com” or “localhost”.
Finally, the API section creates a web portal on port 8080 for monitoring of Traefik.
HAProxy Reverse-Proxy Setup
In this section, we will setup MeshCentral with HAProxy, a small popular reverse proxy software. This section will be much like the previous sections setting up NGNIX and Traefik but with a different software and configuration file. HAProxy is free and available at: https://www.haproxy.org/

This section covers a really simple configuration. HAProxy is capable of a lot more complex configurations. In the following example, HAProxy will perform TLS and forward the un-encrypted traffic to MeshCentral on port 444. HAProxy will add extra “X-Forwarded-Host” headers to the HTTP headers so that MeshCentral will know from the IP address the connection comes from.
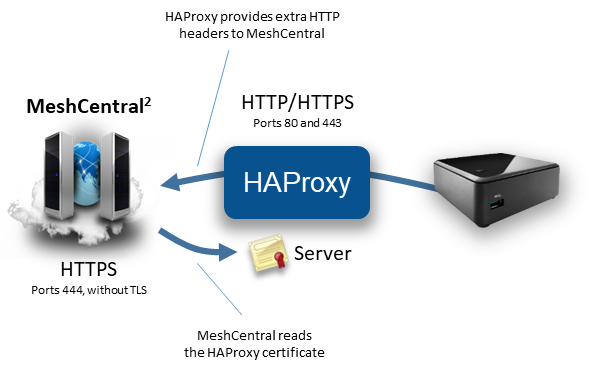
In the following configuration file, we have browser connections on port 80 being redirected to HTTPS port 443. We also have Let’s Encrypt cert bot for getting a real TLS certificate and “mesh.sample.com” being redirected to 127.0.0.1:444.
global
    log /dev/log local0
    log /dev/log local1 notice
    chroot /var/lib/haproxy
    stats socket /run/haproxy/admin.sock mode 660 level admin expose-fd listeners
    stats timeout 30s
    user haproxy
    group haproxy
    daemon

defaults
    log global
    mode http
    option httplog
    option dontlognull
    option forwardfor
    option http-server-close

frontend http
    bind *:80
    redirect scheme https code 301 if !{ ssl_fc }

frontend https
    bind *:443 ssl crt /etc/haproxy/cert.pem
    http-request add-header X-Forwarded-Proto https
    acl acmepath path_beg /.well-known/acme-challenge/
    acl meshcentralhost hdr(host) -i mesh.sample.com
    acl meshcentralhost hdr(host) -i mesh.sample.com:443
    use_backend acme if acmepath
    use_backend meshcentral if meshcentralhost

backend acme
    server certbot localhost:54321

backend meshcentral
    http-request add-header X-Forwarded-Host %[req.hdr(Host)]
    server meshcentral 127.0.0.1:444
On the MeshCentral side, we are not going to use port 80 and need the main HTTPS port to not perform TLS and listen on port 444.
{
  "settings": {
    "Cert": "myservername.domain.com",
    "Port": 444,
    "AliasPort": 443,
    "RedirPort": 0,
    "TlsOffload": "127.0.0.1"
  },
  "domains": {
    "": {
      "certUrl": "https://127.0.0.1:443/"
    }
  }
}
We also specify “127.0.0.1” in TLS offload since we want MeshCentral to make use of the X-Forwarded-Host header that is set by HAProxy.
Running in a Production Environment
When running MeshCentral is a production environment, administrators should set NodeJS to run in production mode. There is a good article here (http://www.hacksparrow.com/running-express-js-in-production-mode.html) on what this mode is and how to set it. This mode will also boost the speed of the web site on small devices like the Raspberry Pi. To run in production mode, the environment variable “NODE_ENV” must be set to “production”. On Linux, this is done like this:
export NODE_ENV=production
On Windows, it’s done like this:
SET NODE_ENV=production
Special care must be taken to set the environment variable in such a way that if the server is rebooted, this value is still set. Once set, if you run MeshCentral manually, you will see:
MeshCentral HTTP redirection web server running on port 80.
MeshCentral v0.2.2-u, Hybrid (LAN + WAN) mode, Production mode.
MeshCentral Intel(R) AMT server running on devbox.mesh.meshcentral.com:4433.
MeshCentral HTTPS web server running on devbox.mesh.meshcentral.com:443.
In production mode, ExpressJS will cache some files in memory making the web server much faster and any exceptions thrown by the ExpressJS will not result in the stack trace being sent to the browser.
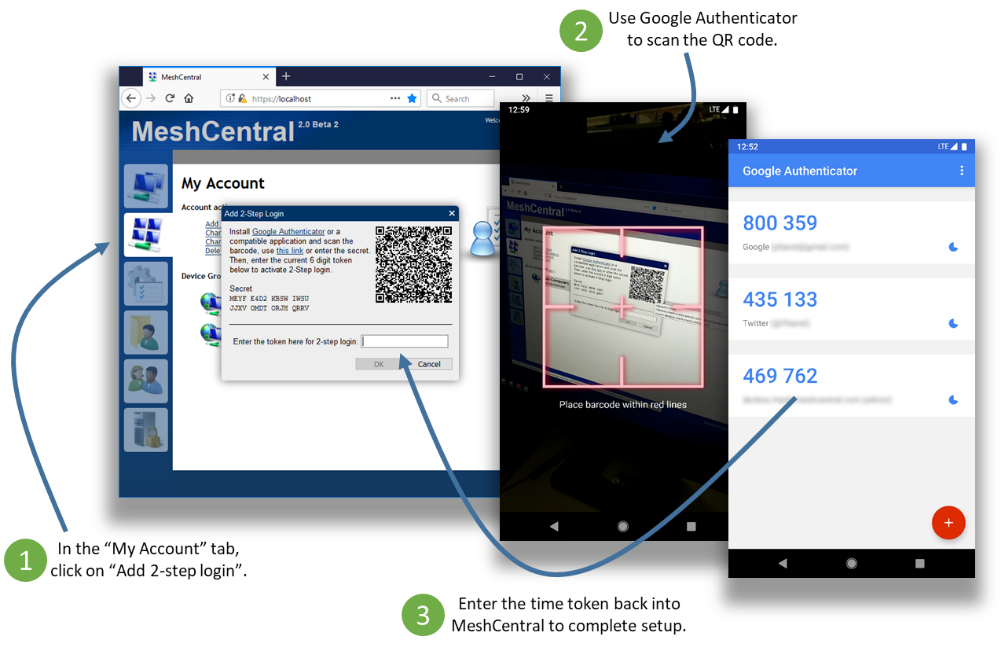
Two step authentication
If the MeshCentral server is setup with a certificate name and not setup to use Windows domain authentication, then users will have the options to use 2-step authentication using the Google Authenticator application or any compatible application. Use of this option should be encouraged for users that manage a lot of critical computers. Once active the users will need to enter their username, password and a time limited token to login.
To get this features setup, users will need to go to the “My Account” tab or the “My Account” menu in the mobile application. They then select, “Add 2-stop login” and follow the instructions.
Note that if a user performs a password recovery using email, the 2-step authentication is then turned off and will need to be turned on again. This is not idea as someone being able to intercept the user’s email could still log into the web site. Users should make sure to properly protect their email account.
Another form of MFA or Multi-factor Authentication is hardware based OTP (One Time Password) solution providing 2FA or Two-factor authentication. Yubikey is fully supported in MeshCentral.
And taking authentication to the next step is removing the login page entirely. Use LoginKey 3FA with MeshCentral.
You can also setup Duo 2FA which is a commertial offering.
Server Backup & Restore
It’s very important that the server be backed up regularly and that a backup be kept offsite. Luckily, performing a full backup of the MeshCentral server is generally easy to do. For all installations make sure to back up the following two folders and all sub-folders.
meshcentral-data
meshcentral-files
If using NeDB that is built into MeshCentral, you are done. If you are running MongoDB, you will need to perform an extra step. In the command shell, run mongodump to archive all of the MongoDB databases.
mongodump --archive=backup.archive
Then, keep the backup.archive file in a safe place. It’s critical that the content of meshcentral-data be backed up in a secure location and preferably using encryption, this is because it contains certificates that give this server its unique personality. Once agents are installed, they will only connect to this server and no other. If you reinstall MeshCentral, even if it is with the same domain name, agents will not connect to the new server since the server certificates are different. Also, someone with access to a backup of “meshcentral-data” could impersonate the server.
To restore back backup, just install a MeshCentral server, make sure it works correctly. Stop it, wipe the old “meshcentral-data” and “meshcentral-files” and put the backup version instead. If using MongoDB, copy the backup.archive back, make sure to clean up any existing “meshcentral” database, run “mongo” and type:
use meshcentral
db.dropDatabase()
Then exit with Ctrl-C and run:
mongorestore --archive=backup.archive
This will re-import the database from the backup. You can then start MeshCentral again.
Note
The two values for backup and restore in the json are only valid for databases backed by NeDB
Backup to Google Drive
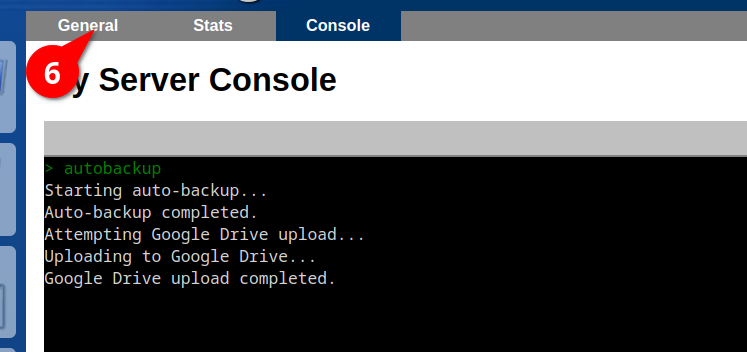
sudo systemctl stop meshcentral.service
nano /opt/meshcentral/meshcentral-data/config.json
Remove underscored items
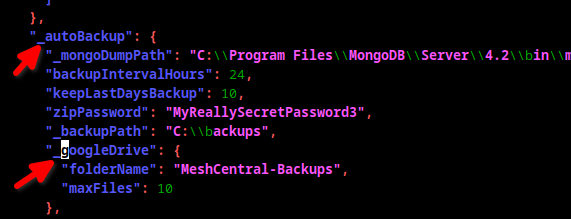
sudo systemctl start meshcentral.service
sudo systemctl status meshcentral.service
Log into your MC:
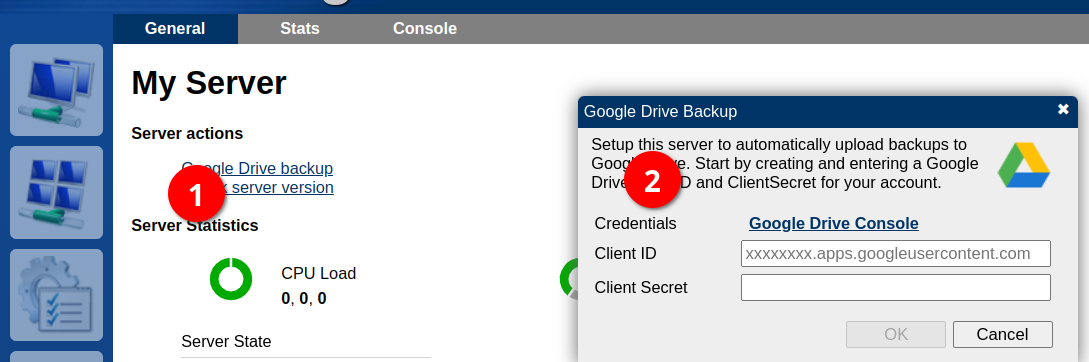
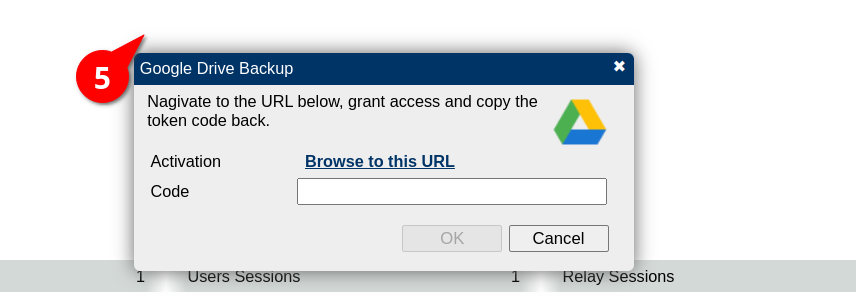
Create desktop app
Enter the Client ID and Client Secret into MC
HashiCorp Vault support
MeshCentral has built-in support for HashiCorp Vault so that all configuration and certificates used by MeshCentral are retrieved from a Vault server. Vault is a secret store server and when used with MeshCentral, the MeshCentral server will not be storing any secrets locally. You can get started with Vault here: https://www.vaultproject.io/
Once you got a MeshCentral server working correctly, you can start a simple demonstration Vault server by typing:
vault server -dev
When you run the server in developer mode, you will see a secret token and unseal key on the screen. These two values will be used in the commands to follow. You can load the configuration file and all certificates from “meshcentral-data” into Vault by typing this:
node node_modules/meshcentral --vaultpushconfigfiles --vault http://127.0.0.1:8200 --token s.cO4… --unsealkey 7g4w… --name meshcentral
Once all of the files have been written into Vault, you can take a look at the Vault web user interface to see all of the secrets. It will be in “secret/meshcentral”:
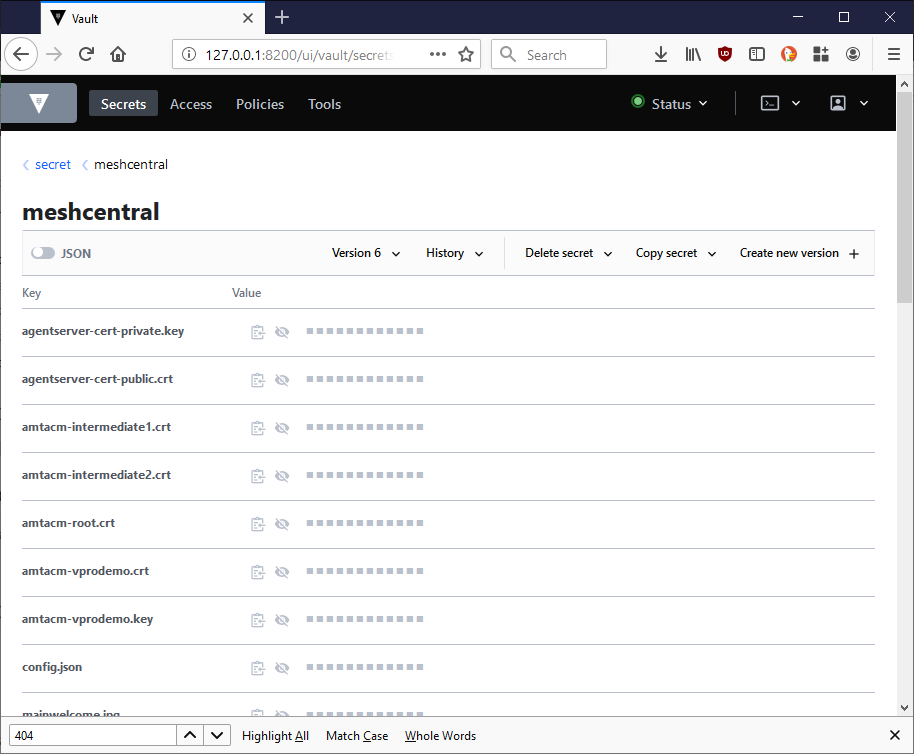
The “config.json” and “terms.txt” files and files in “meshcentral-data” that end with “.key”, “.crt”, “.jpg” and “.png” will be stored in Vault. You can then run MeshCentral like this:
node node_modules/meshcentral --vault http://127.0.0.1:8200 --token s.cO4… --unsealkey 7g4w… --name meshcentral
MeshCentral will first read all of the files from Vault and get started. An alternative to this is to create a very small config.json file in “meshcentral-data” that contains only the Vault configuration like this:
{
  "settings": {
    "vault": {
      "endpoint": "http://127.0.0.1:8200",
      "token": "s.cO4Q…",
      "unsealkey": "7g4wFC…",
      "name": "meshcentral"
    }
  }
}
Once the config.json file is setup, you can just run MeshCentral without any arguments.
node node_modules/meshcentral
Lastly you can all pull all of the files out of Vault using this command line:
node node_modules/meshcentral --vaultpullconfigfiles --vault http://127.0.0.1:8200 --token s.cO4… --unsealkey 7g4w… --name meshcentral
And delete the Vault secrets using this:
node node_modules/meshcentral --vaultdeleteconfigfiles --vault http://127.0.0.1:8200 --token s.cO4… --unsealkey 7g4w… --name meshcentral
Database Record Encryption
Regardless if using the default NeDB database or MongoDB, MeshCentral can optionally encrypt sensitive data that is stored in the database. When enabled, this encryption is applied to user credentials and Intel AMT credentials.
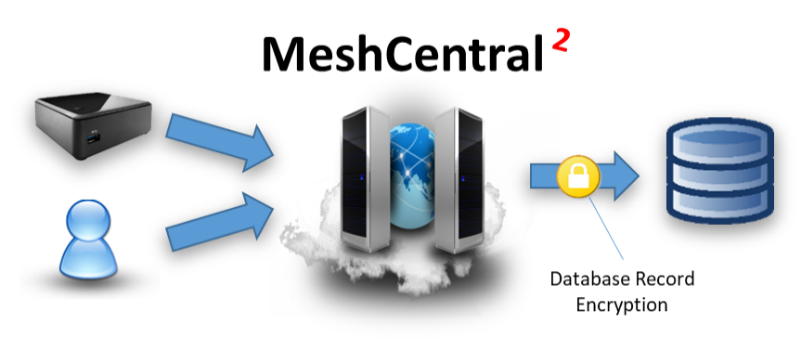
The additional encryption does the affect database operations and can be used in addition to additional database security. In the following image, we see on the left a normal user record including user credential hashes and data required for two-factor authentication. On the right side, these values are encrypted using AES-256-GCM in the “_CRYPT” field.
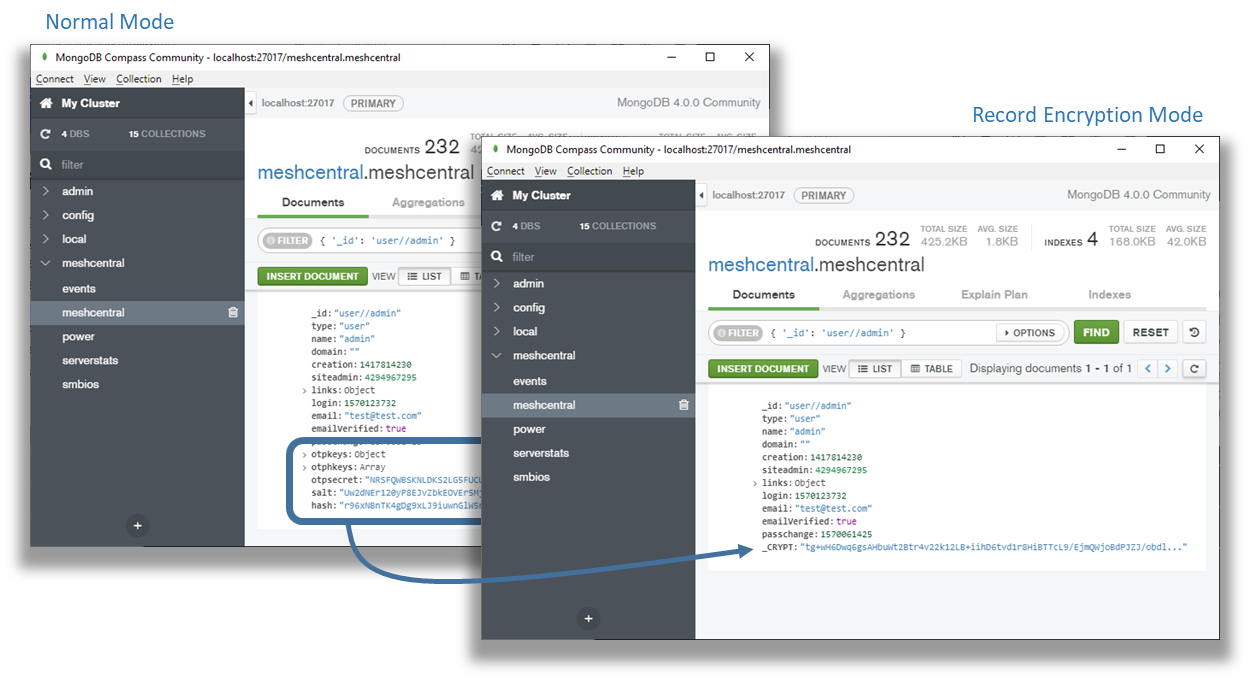
Only some data fields are encrypted and the “_CRYPT” entry will only be present when one or more fields are present that need to be secured. To enable this feature, add the “DbRecordsEncryptKey” with a password string to the “settings” section of the config.json like this:
{
  "settings": {
    "Port": 4430,
    "RedirPort": 800,
    "DbRecordsEncryptKey": "MyReallySecretPassword"
  }
}
The provided password will be hashed using SHA384 and the result with be used as an encryption key. When DbRecordsEncryptKey is set, any new or updated records that are written will be encrypted when needed. Existing encrypted records will be read and decrypted as needed. You can force the all entries to be re-written by running:
node node_modules/meshcentral --recordencryptionrecode
This command will re-write entries in the database that could require added security and force the application of record encryption. You can also specify a key for decryption only like this:
{
  "settings": {
    "Port": 4430,
    "RedirPort": 800,
    "DbRecordsDecryptKey": "MyReallySecretPassword"
  }
}
When set, the key will only be used for decryption and any new or updated records in the database will not be written with record encryption. You can then run this command again to force all records to be rewritten without encryption:
node node_modules/meshcentral --recordencryptionrecode
It’s really important to keep the encryption key in a safe place along with database backups. If the database is backed up but the record encryption key is lost, it will not be possible to recover the secured data in the database.
Also note that database record encryption can and should be used along with other data protection systems.
MongoDB free server monitoring
If running with MongoDB version 4.x, there is a free database monitoring service that is provided. Just run “mongo” and you may see the following:
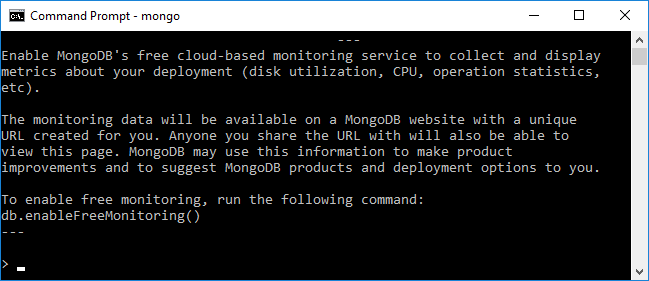
Type “db.enableFreemonitoring()” if you want to enable this. You will be given a URL to access the data and can turn it back off at any time. The web page will look something like this:
In addition to database specific information, the graphs track CPU, memory and disk usage. This can be useful to track how well the server is responding under load.
MeshCentral Single Sign-On (SSO)
As with any web application deployed in organization, it’s convenient and more secure for users to have a single set of credentials that can be used across many services. In this section we take a look at how to configure MeshCentral so that you can sign-in using credentials from other services. This allows users to completely skip creating a user account on MeshCentral or having to remember usernames and password for one more web site. There are two single sign-on protocols that are supported in MeshCentral, OAuth2 and SAML. We will take a look at an example for each one.
Before you get started, your MeshCentral server must be publicly facing on the internet and have a valid TLS certificate. For example, by setting up Let’s Encrypt. After the web site is working correctly user the steps below.
LDAP
You can integrate LDAP using these configuration options
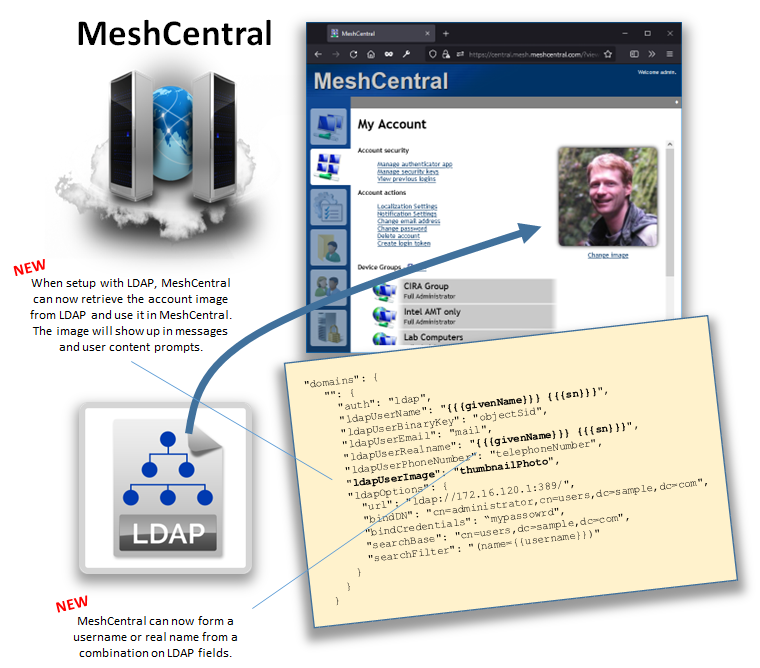
Twitter Authentication
Like many other services, Twitter allows its users to login to other web site using Twitter credentials using OAuth2. Start by creating an account on Twitter and logging in. Then navigate to https://developer.twitter.com/en/apps, this is where you can create new applications that are compatible with Twitter.
Start by creating a new application and fill in the application form. Give your application and name, description, server URL and more.
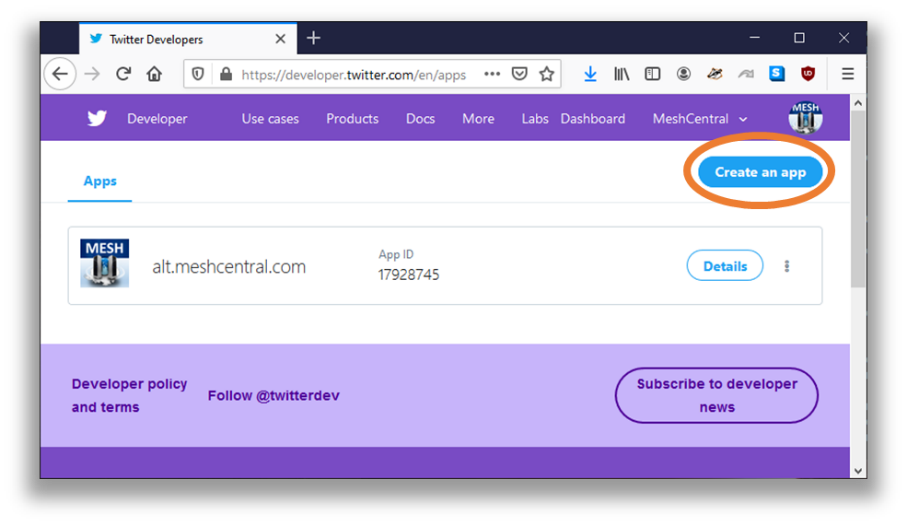
Make sure to select “Enable Sign in with Twitter” and set the callback URL to “https://(server.domain.com)/auth-twitter-callback”. This is the URL that Twitter will redirect users to once they are logged in. For example this is what a sample application would look like:
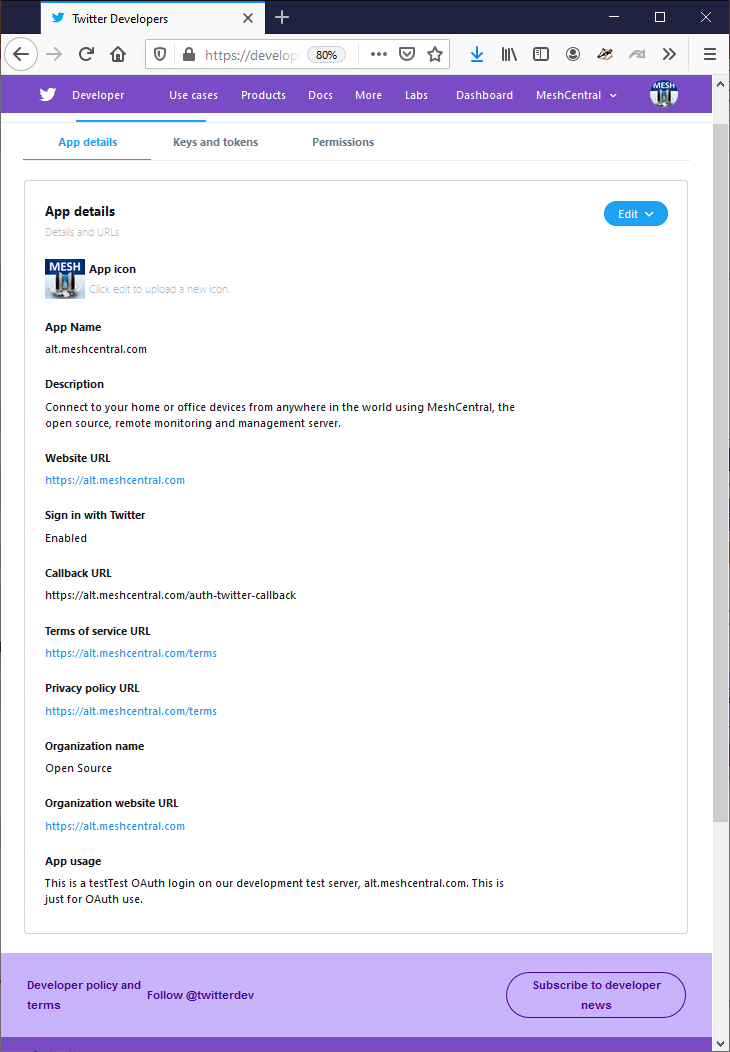
Once the new application is created, go to the “Keys and tokens” tab. You will need the “API Key” and “API secret key” values. In the MeshCentral config.json, place these two values as “clientid” and “clientsecret” of the Twitter section of the “AuthStrategies”.
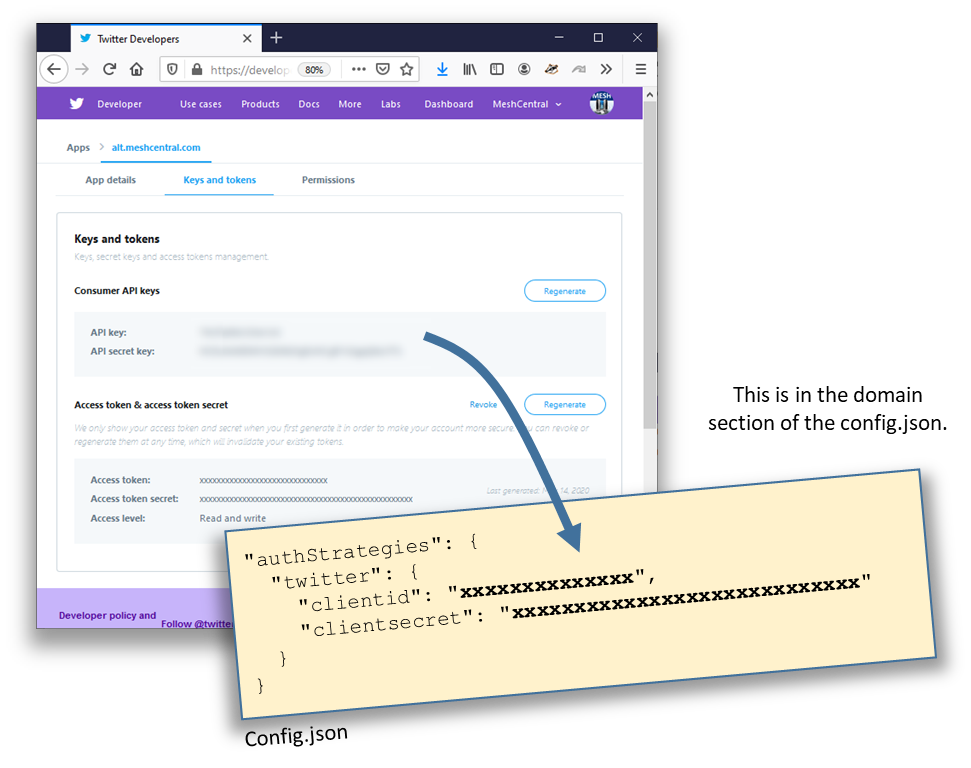
Once done, your config.json should look a bit like this:
{
  "settings": {
    "Cert": "myserver.mydomain.com",
    "Port": 443,
    "RedirPort": 80
  },
  "domains": {
    "": {
      "Title": "MyServer",
      "Title2": "Servername",
      "NewAccounts": true,
      "authStrategies": {
        "twitter": {
          "clientid": "xxxxxxxxxxxxxxxxxxxxxxx",
          "clientsecret": "xxxxxxxxxxxxxxxxxxxxxxxxxxxxxxxxxxxx"
        }
      }
    }
  }
}
Note that if you do not allow new accounts, any new users that use Twitter credentials will not be able to login to MeshCentral. One trick is to allow new account, login and change this setting again. Once the config.json is correct, restart the server and you should see the Twitter icon on the login screen. When restarting the MeshCentral server, new modules will need to be installed to support this new feature. Depending on how your server is setup, you may need to restart the server manually to allow the new modules to be installed.
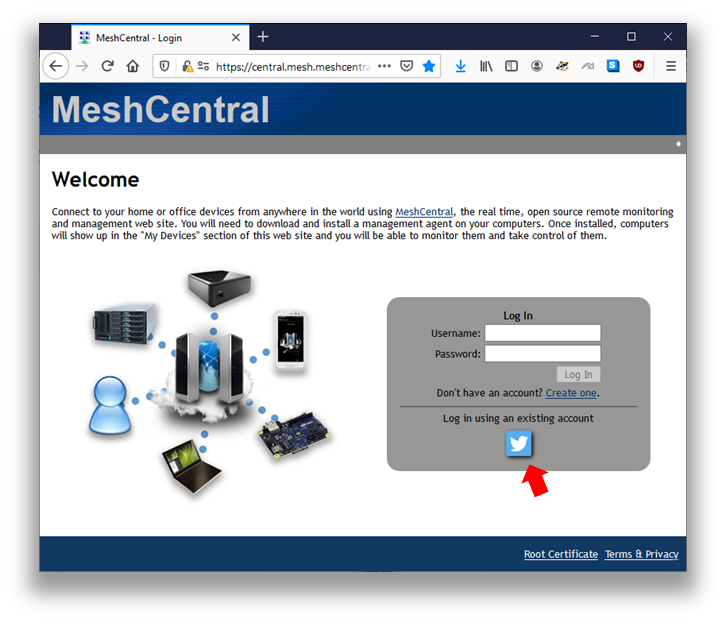
Google, GitHub, Reddit Authentication
The exact same process as shown in the previous section can be repeated for Google, GitHub and Reddit. In each case, you need to go to each respective credential provider and get a “ClientID” and “ClientSecret” for each service. You also need to register the correct callback URL for each service. Take a look at the config.json below and note the callback URL that will need to be registered for each service provider.
{
  "settings": {
    "Cert": "myserver.mydomain.com",
    "Port": 443,
    "RedirPort": 80
  },
  "domains": {
    "": {
      "Title": "MyServer",
      "Title2": "Servername",
      "NewAccounts": true,
      "authStrategies": {
        "twitter": {
          "__callbackurl": "https://server/auth-twitter-callback",
          "clientid": "xxxxxxxxxxxxxxxxxxxxxxx",
          "clientsecret": " xxxxxxxxxxxxxxxxxxxxxxxxxxxxxxxxxxx "
        },
        "google": {
          "__callbackurl": "https://server/auth-google-callback",
          "clientid": "xxxxxxxxxxxxxxxxxxxxxxxxxx.apps.googleusercontent.com",
          "clientsecret": "xxxxxxxxxxxxxxxxxxxxxxx"
        },
        "github": {
          "__callbackurl": "https://server/auth-github-callback",
          "clientid": "xxxxxxxxxxxxxxxxxxxxxxx",
          "clientsecret": "xxxxxxxxxxxxxxxxxxxxxxxxxxxxxxxxxxx"
        },
        "reddit": {
          "__callbackurl": "https://server/auth-reddit-callback",
          "clientid": "xxxxxxxxxxxxxxxxxxxxxxx",
          "clientsecret": " xxxxxxxxxxxxxxxxxxxxxxxxxxxxxxxxxxx "
        }
      }
    }
  }
}
It’s possible to enable all four of these service providers at the same time to offer the most flexibility for users. Note that when using an OAuth service provider, MeshCentral does not offer two-factor authentication since it will be handled by the provider depending on user configuration.
Microsoft Azure Active Directory
In this section we look at how to setup MeshCentral to Azure Active Directory using OAuth. Like all other sections about setting up single sign-on, make sure your MeshCentral server is already setup on the public Internet with a valid TLS certificate. You can then start by adding a new application registration to the Azure portal.
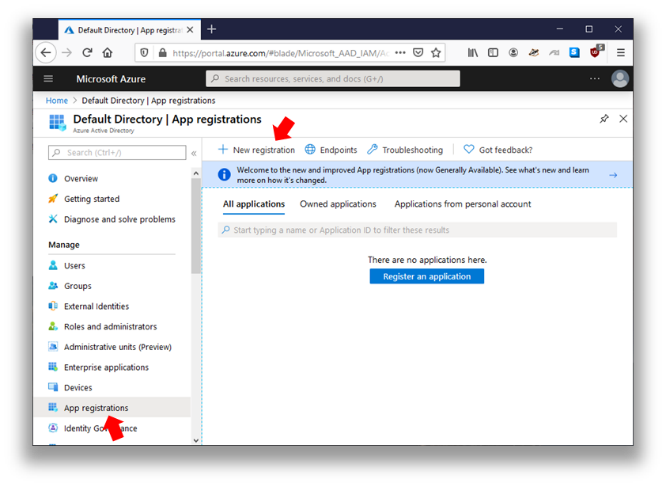
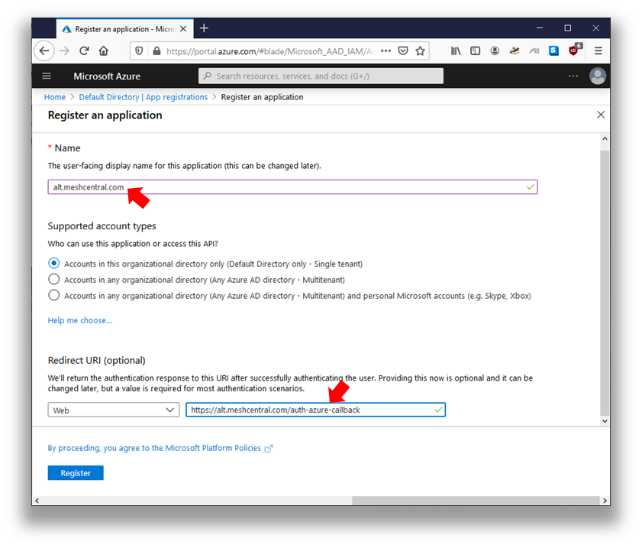
We give our application a name, generally the domain name of the MeshCentral server is a good choice. Then you can setup the redirect URL to https://[servername]/auth-azure-callback. Make sure to type this correctly, all lower case with the full domain name of your MeshCentral server. Once done, there are two values we will need later, the Application ID and Tenant ID.
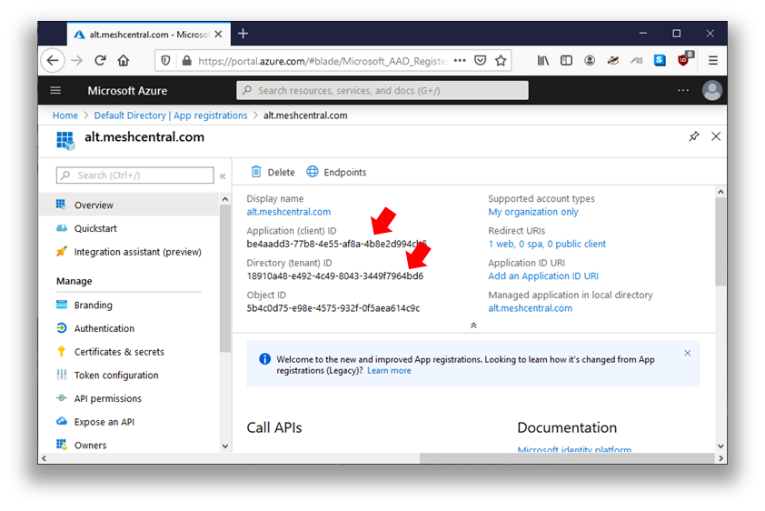
Next, we need to create a secret that will be shared between Azure and MeshCentral. Go to the “Certificates & secrets” section and click “New client secret”. You then enter a name and for our example, we will opt to never make it expire.
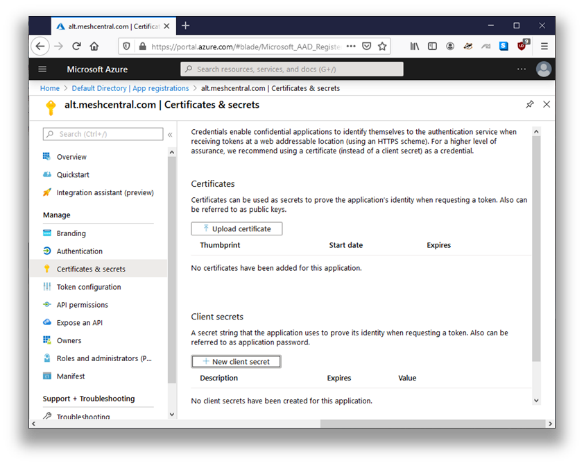
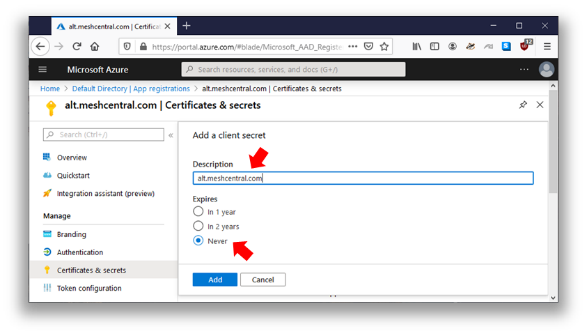
We then copy the resulting secret and this will be the 3rd and final value we need to get MeshCentral setup. Now, we take the application ID, tenant ID and secret and place these values in the MeshCentral config.json like so:
{
  "settings": {
    "Cert": "myserver.mydomain.com",
    "Port": 443,
    "RedirPort": 80
  },
  "domains": {
    "": {
      "Title": "MyServer",
      "Title2": "Servername",
      "NewAccounts": false,
      "authStrategies": {
        "azure": {
          "newAccounts": true,
          "clientid": "be4aadd3-77b8-4e55-af8a-4b8e2d994cb5",
          "clientsecret": "NP0XXXXXXXXXXXXXXXXXXX",
          "tenantid": "18910a48-e492-4c49-8043-3449f7964bd6"
        }
      }
    }
  }
}
The “Application ID” value is placed as “Client ID” in the configuration file. You can also see that in the example above, we have “NewAccounts” set to false in the default MeshCentral domain, but set to true in the Azure section. This indicates that new accounts are not allowed in this domain except if it’s a new user that is authenticating thru Azure. Once done, restart the MeshCentral server. Depending on your setup, you many need to run MeshCentral once manually to allow new required modules to be installed. Once running again, you should see the Azure single sign-on button on the login page.
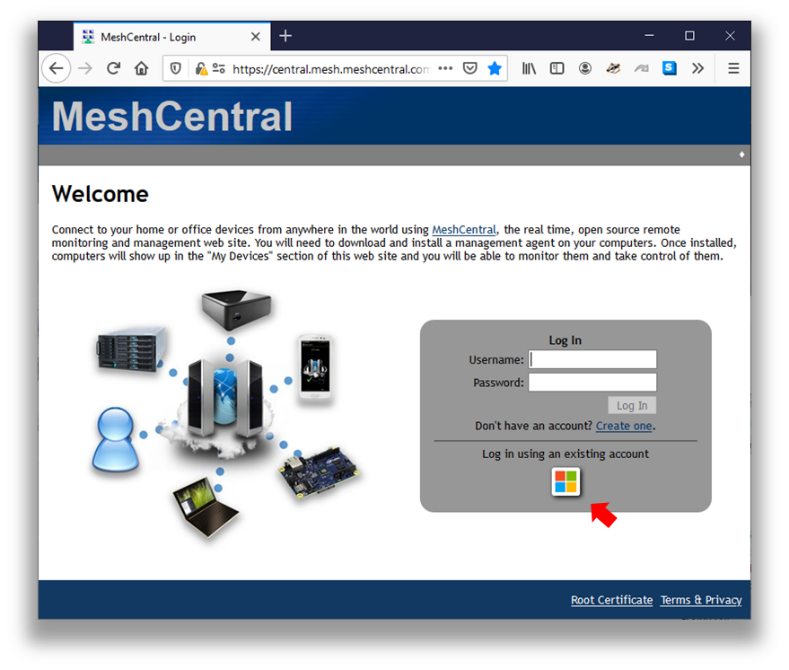
JumpCloud Authentication using SAML
While using OAuth may be interesting, it’s more likely that MeshCentral servers used in an enterprise environment will want to use SAML (Security Assertion Markup Language). This is a widely deployed sign-on protocol used in enterprises so that, for example, employees can login to many different web sites using a single set of company credentials. MeshCentral can be one of many web sites that some users may want to log into.
In this section, we setup MeshCentral with JumpCloud, an easy to use sign-in provider. You can create an account on JumpCloud for free with up to 10 users allowing you to quickly get setup and test the following setup. In the next section, we look at a generic SAML configuration.
Before getting started with this section, make sure your server is on the Internet and publicly available and that it has a valid TLS certificate. You can use Let’s Encrypt to get a valid TLS certificate. Then, start by going to https://jumpcloud.com and creating an administrator account. Once setup, go to “Applications” and click on the big plug sign to create a new application.
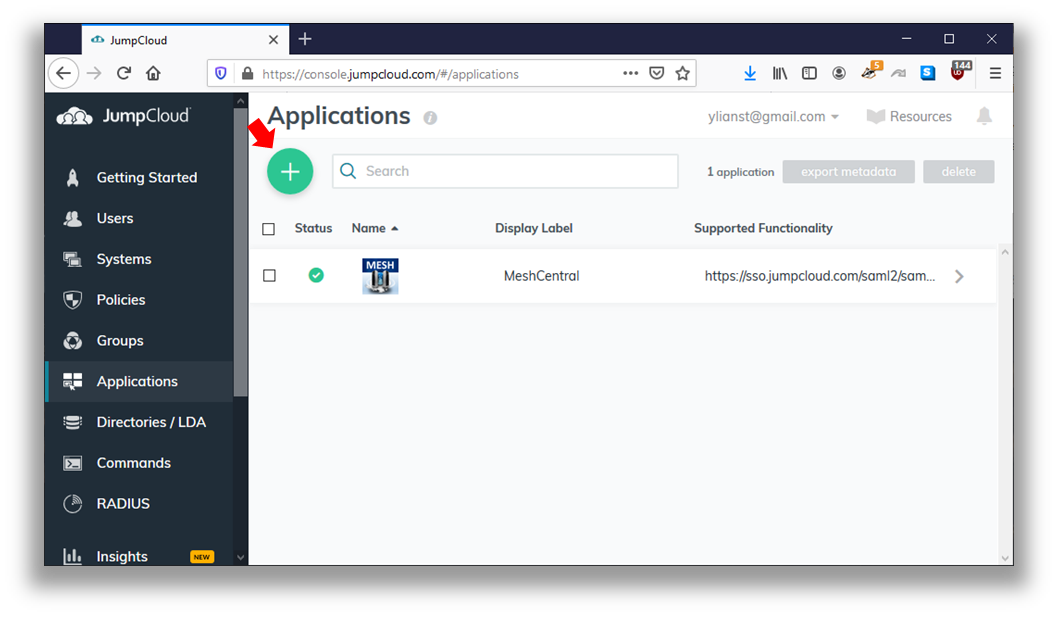
You will need to create a custom SAML application by clicking the “Custom SAML App”.
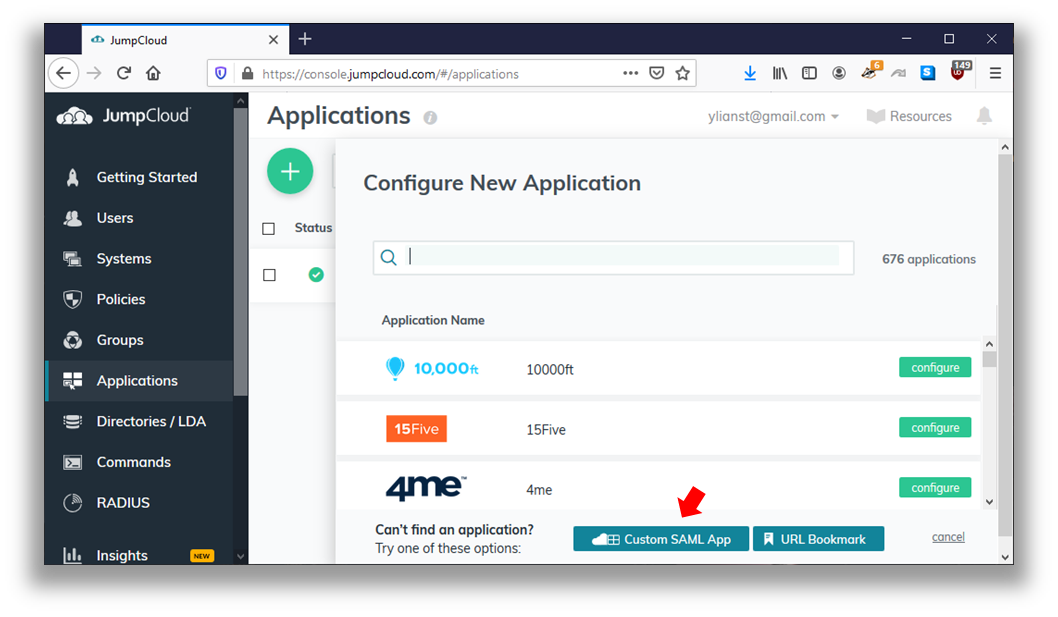
Then, you can fill in the form with an application name and logo.
- For the IdP Entity ID, put “jumpcloud”.
- For the SP Entity ID put “meshcentral”.
- For the ACS URL, put the callback URL of your server. In this case it will be “https://(yourservername)/auth-jumpcloud-callback”
- Lastly in the attributes section, add 3 user attribute mapping.
- “firstname” to “firstname”
- “lastname” to “lastname”
- “email” to “email”
The attribute mappings will allow MeshCentral to receive from JumpCloud the first and last name of the user and the email address of the use. If any of these values are changed in the future, MeshCentral will update them the next time the user logs into MeshCentral. Here is an example configuration with red arrows next to important values.
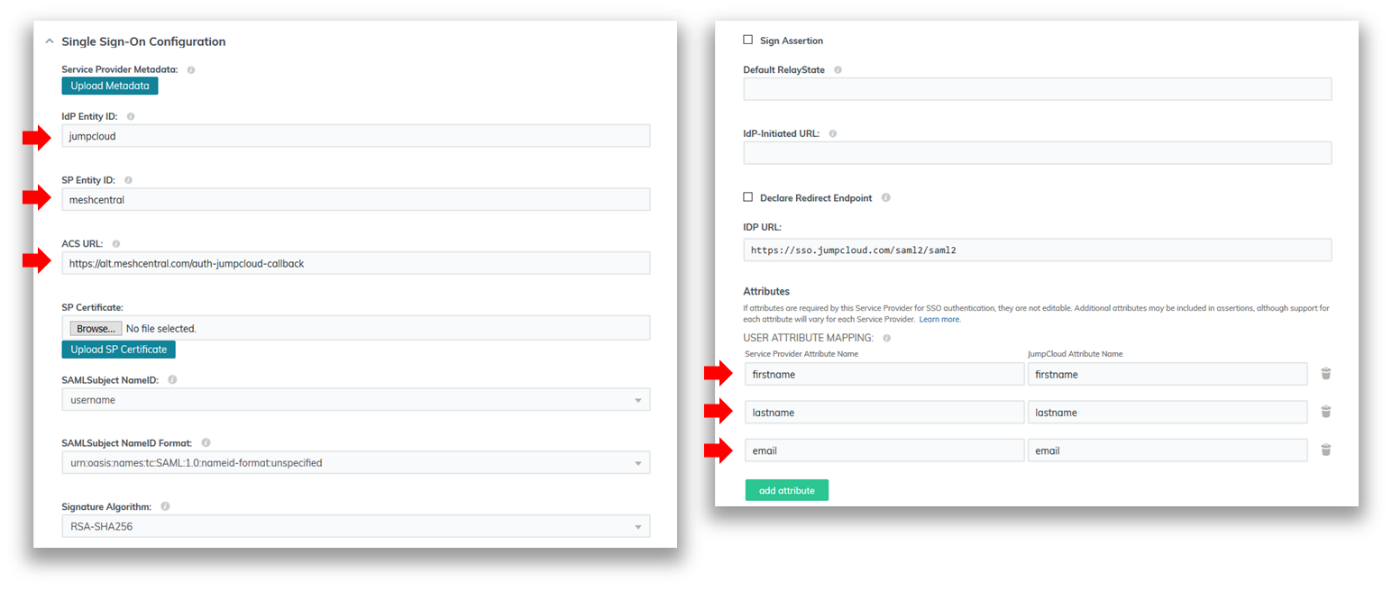
Once setup, you will need to allow one or more users to use the new application. One way to do this is to just add your new application to the “All Users” group.
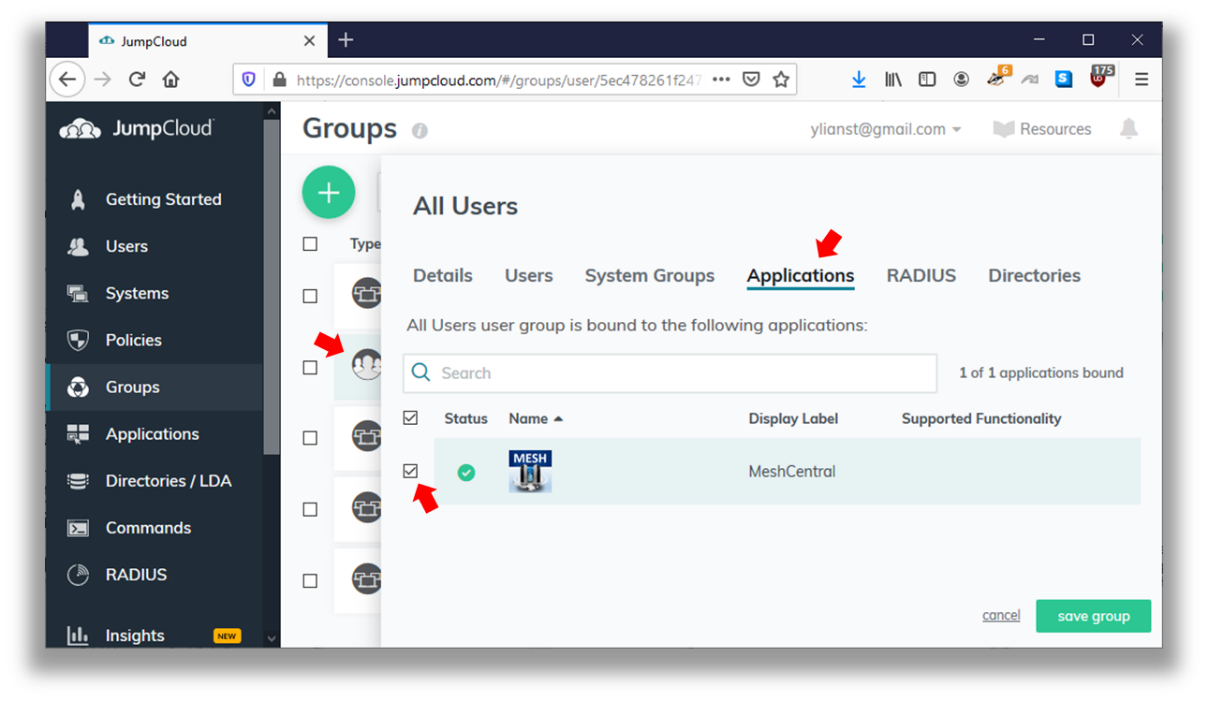
We are now almost done with JumpCloud. The last thing we need to do is download the certificate that JumpCloud will be using to sign the SAML assertions. You can get this certificate by going in the “Applications” tab, click on your new application and select “Download Certificate” as shown here.
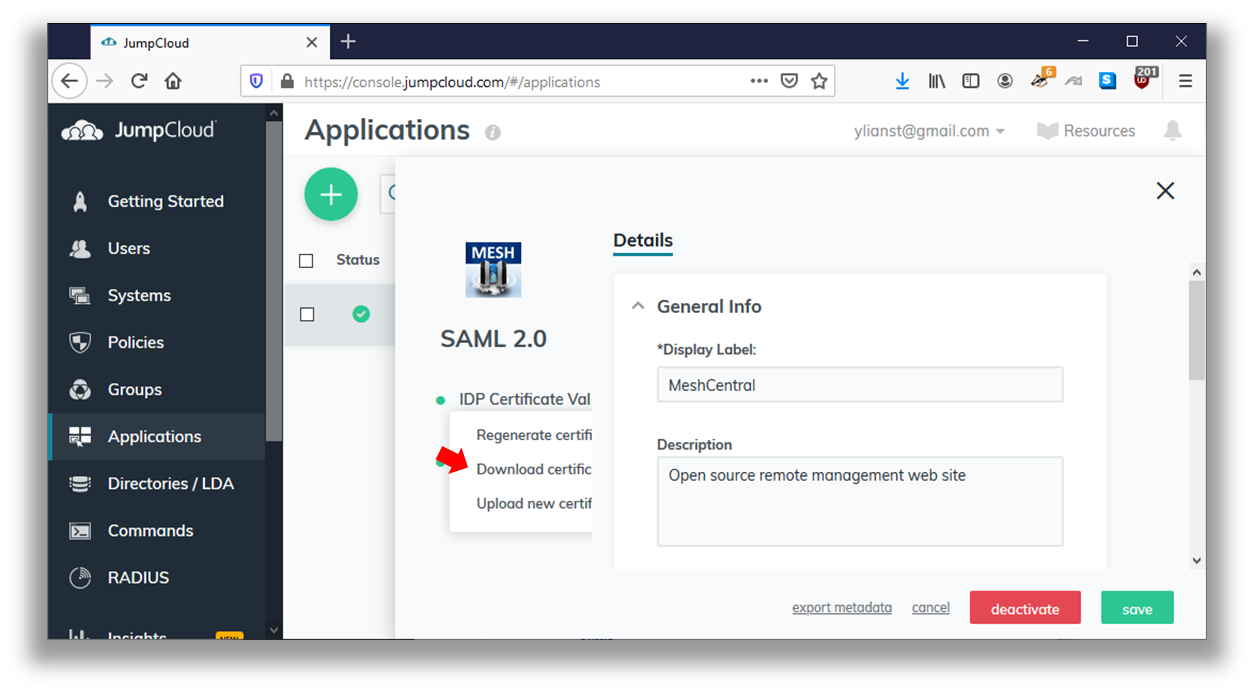
Save the certificate as “jumpcloud-saml.pem” and place it in the “meshcentral-data” folder. You are now ready to configure MeshCentral. Edit the config.json and make it look like this:
{
  "settings": {
    "Cert": "myserver.mydomain.com",
    "Port": 443,
    "RedirPort": 80
  },
  "domains": {
    "": {
      "Title": "MyServer",
      "Title2": "Servername",
      "NewAccounts": false,
      "authStrategies": {
        "jumpcloud": {
          "__callbackurl": "https://server/auth-jumpcloud-callback",
          "NewAccounts": true,
          "entityid": "meshcentral",
          "idpurl": "https://sso.jumpcloud.com/saml2/saml2",
          "cert": "jumpcloud-saml.pem"
        }
      }
    }
  }
}
Take note that the “entityid”, “idpurl” and “cert” are values taken from JumpCloud. The callback URL should be configured in JumpCloud as we have done in previous steps. You can see that in the example above, we have “NewAccounts” set to false in the default MeshCentral domain, but set to true in the JumpCloud section. This indicates that new accounts are not allowed in this domain except if it’s a new user that is authenticating thru JumpCloud.
You are now ready to restart the MeshCentral server. Extra modules will be needed to support SAML and so, depending on your server configuration, you may need to run MeshCentral manually once to allow the new modules to be installed from NPM. Once restarted, you should see the JumpCloud sign-in button on the login screen.
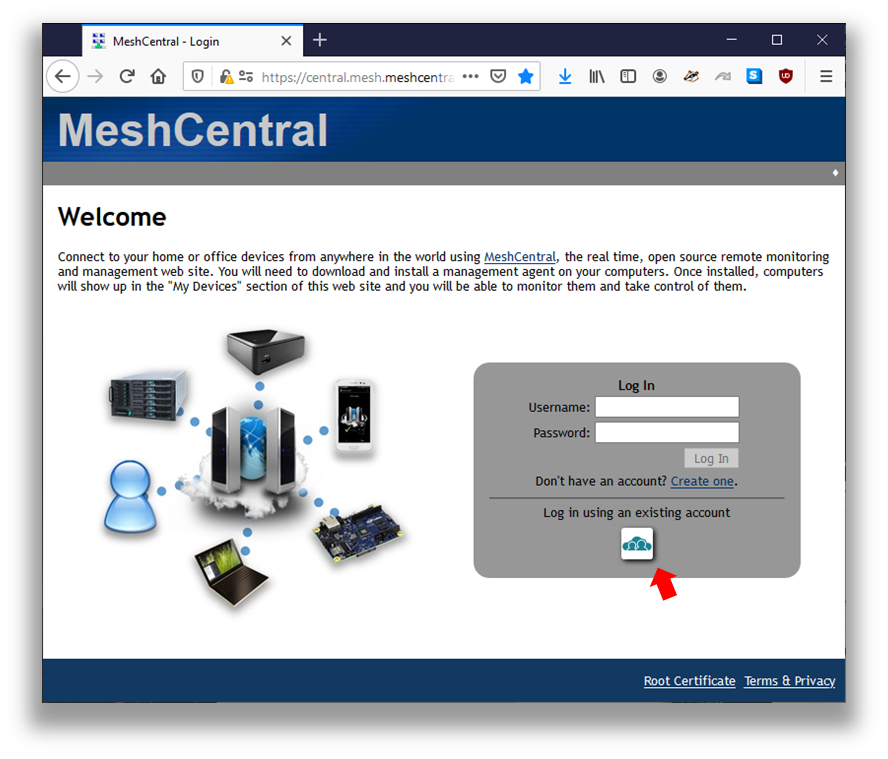
Users can sign-in using the regular username and password or using JumpCloud.
Generic SAML setup
In this section, we look at configuring SAML with a generic authentication provider. The setup is exactly the same as with JumpCloud in the previous section, but we will be using a different section in the config.json to that a generic login icon is shown on the login page.
A generic SAML setup will look like this:
{
  "settings": {
    "Cert": "myserver.mydomain.com",
    "Port": 443,
    "RedirPort": 80
  },
  "domains": {
    "": {
      "Title": "MyServer",
      "Title2": "Servername",
      "NewAccounts": 1,
      "authStrategies": {
        "saml": {
          "__callbackurl": "https://server/auth-saml-callback",
          "entityid": "meshcentral",
          "idpurl": "https://server/saml2",
          "cert": "saml.pem"
        }
      }
    }
  }
}
The callback URL will be of the form “https://(servername)/auth-saml-callback”. You should set the entityid, idpurl as given by the identity provider. Lastly, place the identity provider certificate file in the “meshcentral-data” folder and indicate the name of the file in “cert”. Once setup, restart the server and you should see a Single Sign-on button on the login screen.
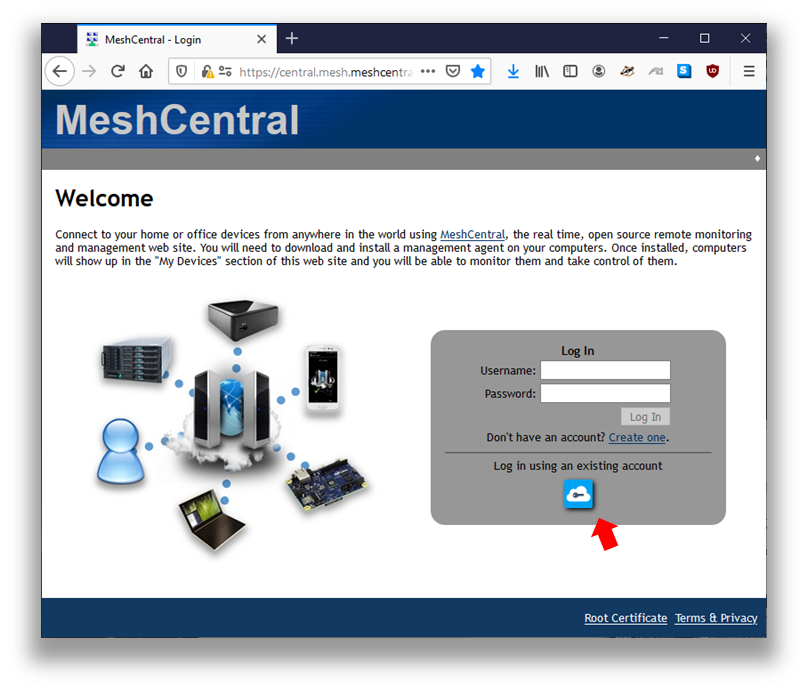
Enabling SAML will require MeshCentral to install extra modules from NPM, so depending on your server configuration, you may need to run MeshCentral once manually.
Note
MeshCentral only supports "POST". For example Authentik's default setting is to use "Redirect" as a "Service Provider Binding".
Generic OpenID Connect Setup
Generally, if you are using an IdP that supports OpenID Connect (OIDC), you can use a very basic configuration to get started, and if needed, add more specific or advanced configurations later. Here is what your config file will look like with a basic, generic, configuration.
{
    "settings": {
        "cert": "mesh.your.domain",
        "port": 443,
        "sqlite3": true
    },
    "domains": {
        "": {
            "title": "Mesh",
            "title2": ".Your.Domain",
            "authStrategies": {
                "oidc": {
                    "issuer": "https://sso.your.domain",
                    "clientid": "XXXXXXXX-XXXX-XXXX-XXXX-XXXXXXXXXXXX",
                    "clientsecret": "XXXXXXXXXXXXXXXXXXXXXXXXXXXXXXXXXXXXXX",
                    "newAccounts": true
                }
            }
        }
  }
}
As you can see, this is roughly the same as all the other OAuth2 based authentication strategies. These are the basics you need to get started using OpenID Connect because it's still authenticating with OAuth2. If you plan to take advantage of some of the more advanced features provided by this strategy you should consider reading the additional strategy documentation.
NOTE: MeshCentral will use
https://mesh.your.domain/auth-oidc-callbackas the default redirect uri.
Improvements to MeshCentral
In 2007, the first version of MeshCentral was built. We will refer to it as “MeshCentral1”. When MeshCentral1 was designed, HTML5 did not exist and web sockets where not implemented in any of the major browsers. Many design decisions were made at the time that are no longer optimal today. With the advent of the latest MeshCentral, MeshCentral1 is no longer supported and MeshCentral v2 has been significantly redesigned and mostly re-written based of previous version. Here is a list of improvements made in MeshCentral when compared with MeshCentral1:
- Quick Installation – By having MeshCentral published on NPM (www.npmjs.com) it’s now easy to download and install MeshCentral on both Linux and Windows*. On Linux* you can use NPM directly (“npm install meshcentral”) and on Windows you can use the .MSI installer.
- Cross-Platform Support – Contrary to MeshCentral1 that only runs on Windows*, MeshCentral can run on any environment that supports NodeJS. This includes Windows*, Linux* and OSX*. Because MeshCentral runs on Linux, it often lowers hosting costs and makes it possible to run MeshCentral in a Docker* container environment.
- Runs with Little Compute Resources – Typical MeshCentral1 installation requires a large disk space foot print (approx* 30G of disk space) and is compute intensive even for small deployments. MeshCentral requires little resources to host (70MB) and able to deliver reasonable performance on a 900Mhz CPU with 1GB RAM.
- Multi-Tenancy and Load Balancing Support – MeshCentral can handle hosting many server instances at once. Each instance or “domain” has it’s own administrators, users and computers to manage. The server can handle each instance using a url path “server.com/customer1” or a DNS name “customer1.server.com”. Many customers can be handled by having all the DNS names point to the same server IP address. MeshCentral will take care of serving the right TLS certificate for each connection.
- Single Executable – MeshCentral is a single-module or single executable server. All of the components of MeshCentral1 including IIS, Swarm, AJAX, Social, Manageability Servers are all build into one single executable. This makes it super easy to setup and run, it also minimizes problems and overhead caused by having many components communicate to each other. When the server is updated, all of the components are updated at once and effective.
- Web Application Design – MeshCentral1 has 100’s of web pages and often times a click on a web page causes the browser to load a different web page and this creates more load on the server. With MeshCentral there are only two main web pages: The login page and the main web application. This design is much more responsive since the server now delegates most of the UI workload to the client’s web browser.
- Real-Time User Interface – In MeshCentral, the user never has to hit the “refresh” button to update the web page. The web interface is completely real-time and updates as things change. MeshCentral uses websockets to connect to the server and get real-time events.
- Single Programming Language – MeshCentral1 used JavaScript on the browser, C# on the server and C for the agent. Use of 3 different programming languages means that developers wanting to implement a new use-case needs to have sufficient skills to change between these 3 languages during the coding session. Makes the code significantly more difficult to understand and maintain.
- Support for LAN only Mode – MeshCentral is capable of being setup as “LAN only” mode. In fact, this is the default mode when no static name or IP address is provided. In this mode, MeshAgents perform a multicast search on the network for the server making a static DNS/IP unnecessary.
- Support for TLS Offloaders – TLS offloaders are now fully supported. This means that MeshCentral can handle way more network connections and traffic significantly.
- Support for CIRA User/Pass Login – MeshCentral now supports both Intel AMT CIRA user/pass login and certificate login. Compared to MeshCentral1 that only supported certificate login, user/pass login is easier to setup and it can also be used for TLS offloaders and CIRA authentication.
- No Live State Stored in the Database – One if the big problems with MeshCentral1 is that a lot of the live states (Agent, User and AMT connections and disconnections) needed to be stored in the database. This caused a few problems, first the extra load on the database that was un-necessary, but also that servers did not have real-time state information about other servers (they had to query the database). This resulted in more load on the database and scaling issues. In MeshCentral, all live states are kept in the RAM which boosts performance significantly.
- Agentless Intel AMT Support – With MeshCentral1, administrators have to install the MeshAgent software on all computers, even if it was only for used for Intel AMT. MeshCentral supports a new agent-less mesh type that allows administrators to just setup the server strictly for Intel AMT only.
- Latest Security & Crypto algorithms – MeshCentral uses all the latest cryptographic algorithm, notably SHA384 and RSA3072 making it more resistant to future quantum computer attacks. This would be very difficult to retrofit into MeshCentralv1 since it would require change of database schema and 1000’s of line of code thus making the server incompatible with the current version version, making migration difficult.
- Support for Email Verification and Password Recovery – MeshCentral can be configured with an SMTP server to send out e-mail confirmation messages and password recovery message. This is an important feature that was missing in MeshCentral1.
- MeshInterceptor Support – MeshCentral can insert HTTP and Intel AMT redirection credential into a live data stream. This is useful to allow an administrator to securely pass Intel AMT password and control over an Intel AMT computer via web browser without the additional administrator login UI.
It’s possible to perform migration to MeshCentral from MeshCentral1 server using a migration package. The MeshCentral Migration Tool will convert your existing user database into a format that can be imported into MeshCentral.
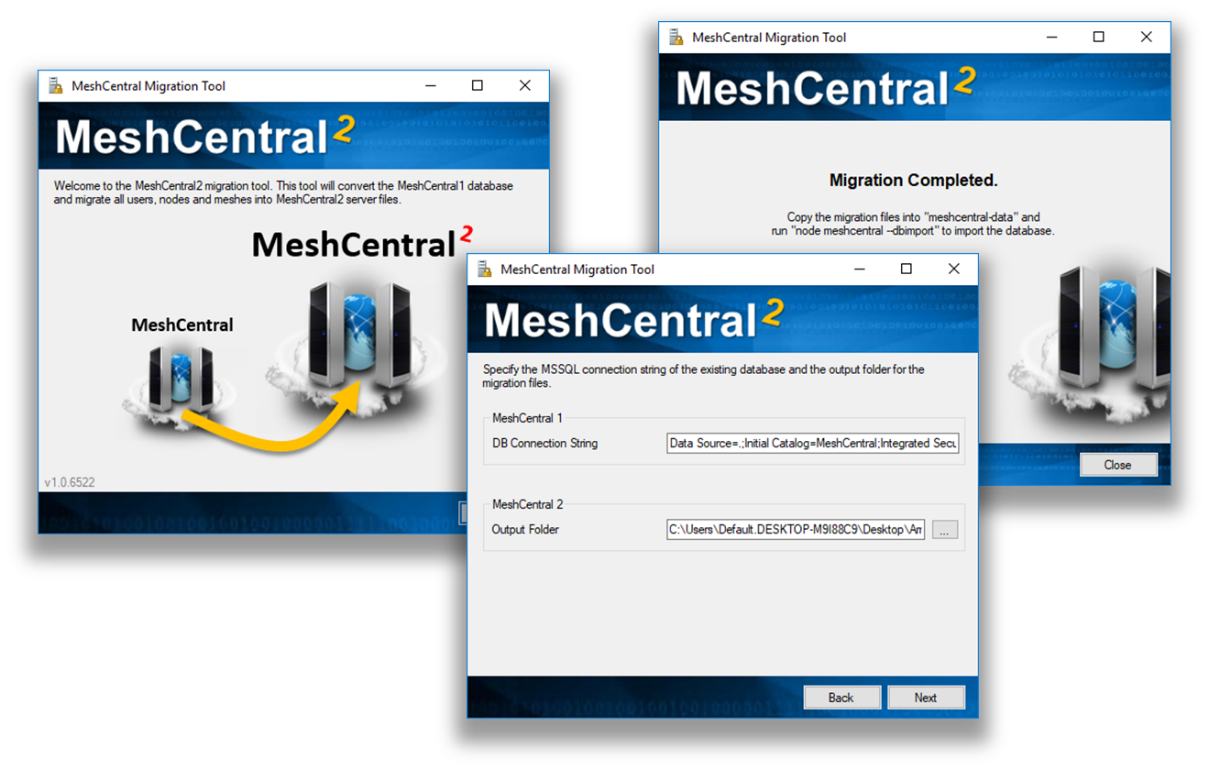
In addition to the migration tool, MeshCentral has a special module that will update all MeshAgents from v1 to v2 so the transition should be simple.
Additional Resources
In addition to this document, there are a growing set of MeshCentral tutorial videos available on YouTube which covers all of the basic at www.meshcommander.com/meshcentral2/tutorials. The tutorial includes videos on how to perform server installation using both the Windows MSI installer and NPM methods.
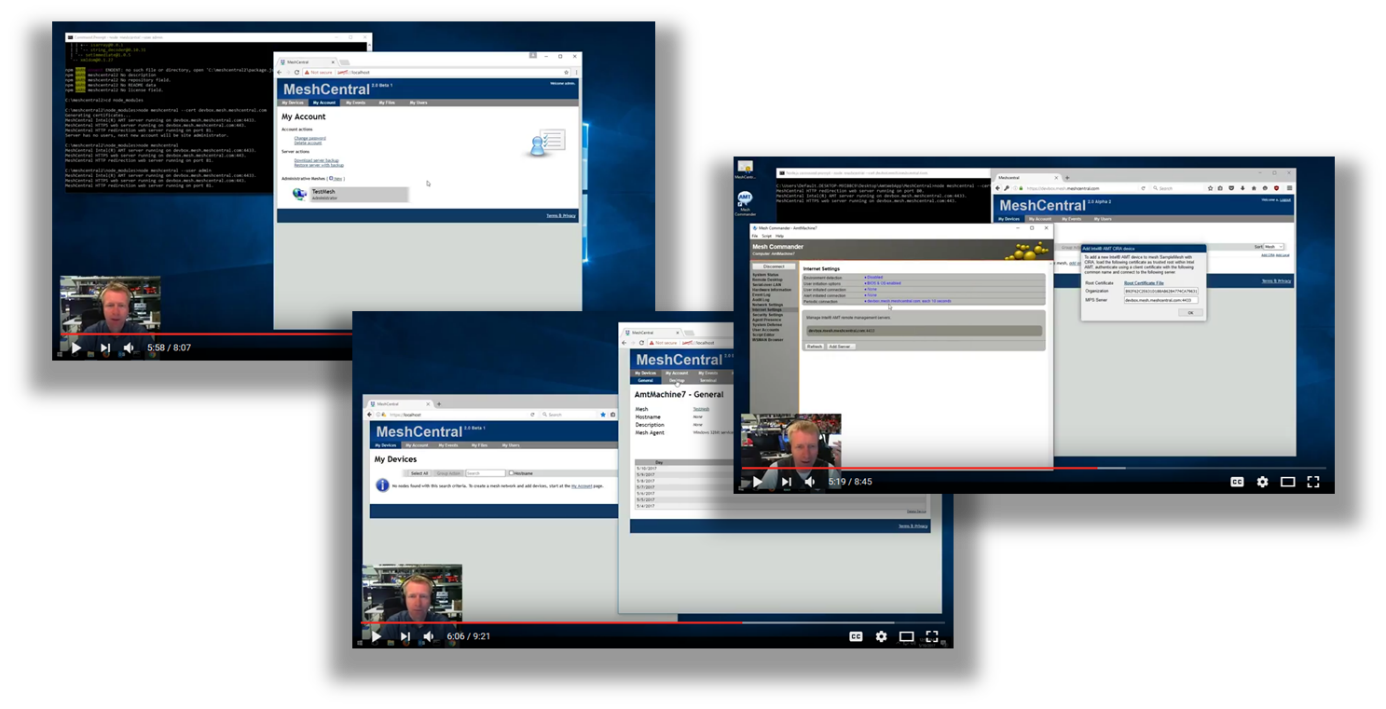
Conclusion
MeshCentral is a free, open source and powerful remote management solution that is cross-platform. In this document, we have covered in detail on how to install and configure MeshCentral server to meet specific environment and use-case. MeshCentral works in many environments and situations. MeshCentral is not only simple to install but also takes minimal resources to host which makes it a very good remote management solution. As with any good software, MeshCentral will continue to be updated and evolve.
License
MeshCentral and this document are both opens source and licensed using Apache 2.0, the full license can be found at https://www.apache.org/licenses/LICENSE-2.0.
Annex 1: Sample Configuration File
In this annex, we present a complete sample config.json file. You would put this file in the “meshcentral-data” folder that is created when MeshCentral is first run. The config.json is completely optional and the server will run with default values with it. All key names in this file are case insensitive.
{
  "settings": {
    "MongoDb": "mongodb://127.0.0.1:27017/meshcentral",
    "MongoDbCol": "meshcentral",
    "Port": 4430,
    "AliasPort": 443,
    "RedirPort": 800,
    "TlsOffload": "127.0.0.1",
    "MpsPort": 44330,
    "MpsAliasPort": 4433,
    "MpsTlsOffload": true,
    "SessionTime": 30,
    "SessionKey": "MyReallySecretPassword",
    "AllowLoginToken": true,
    "AllowFraming": true,
    "WebRTC": true,
    "ClickOnce": true
  },
  "domains": {
    "": {
      "Title": "MyServer",
      "Title2": "Servername",
      "TitlePicture": "title-sample.png",
      "UserQuota": 1048576,
      "MeshQuota": 248576,
      "NewAccounts": true,
      "Footer": "<a href='https://twitter.com/mytwitter'>Twitter</a>",
      "PasswordRequirements": { "min": 8, "max": 128, "upper": 1, "lower": 1, "numeric": 1, "nonalpha": 1 }
    },
    "customer1": {
      "Dns": "customer1.myserver.com",
      "Title": "Customer1",
      "Title2": "TestServer",
      "NewAccounts": 1,
      "Auth": "sspi",
      "Footer": "Test"
    },
    "info": {
      "share": "C:\\ExtraWebSite"
    }
  },
  "letsencrypt": {
    "email": "myemail@myserver.com ",
    "names": "myserver.com,customer1.myserver.com",
    "rsaKeySize": 3072,
    "production": false
  },
  "peers": {
    "serverId": "server1",
    "servers": {
      "server1": { "url": "wss://192.168.2.133:443/" },
      "server2": { "url": "wss://192.168.1.106:443/" }
    }
  },
  "smtp": {
    "host": "smtp.myserver.com",
    "port": 25,
    "from": "myemail@myserver.com",
    "tls": false
  }
}
All these values are examples only, this config.json should just be used as an example and none of the values here are real.
Annex 2: Tips & Tricks
In this annex, we present various suggestions. These are often found by users on the GitHub community and readers are encouraged to participate. The GitHub community is at: https://github.com/Ylianst/MeshCentral/issues
Remote Terminal
When doing a remote terminal session to a Linux computer, it may be interesting to run the bash shell under a different user. One would typically use the command:
su -s /bin/bash myOtherUser
However, because bash is not run in interactive mode, the command line prompt may be empty and history keys (up and down), tab and backspace will not work right. The correct command is:
su -c '/bin/bash -i' myOtherUser
This will run bash in interactive mode and work correctly.
SSH and SFTP integration to the Terminal
MeshCentral has built-in web-based integration of SSH in the "Terminal" tab and SFTP in the "Files" tab.