Customization
Whitelabeling your MeshCentral installation to personalize it to your company's brand, as well as having your own terms of use is one of the first things many people do after installation.
Web Branding
You can put your own logo on the top of the web page. To get started, get the file “logoback.png” from the folder “node_modules/meshcentral/public/images” and copy it to your “meshcentral-data” folder. In this example, we will change the name of the file “logoback.png” to “title-mycompany.png”. Then use any image editor to change the image and place your logo.

Once done, edit the config.json file and set one or all of the following values:
"domains": {
  "": {
    "Title": "",
    "Title2": "",
    "TitlePicture": "title-sample.png",
    "loginPicture": "logintitle-sample.png",
    "welcomeText": "This is sample text",
    "welcomePicture": "mainwelcome-04.jpg",
    "welcomePictureFullScreen": true,
    "siteStyle": "1",
    "nightMode": "1",
    "meshMessengerTitle": "Mesh Chat",
    "meshMessengerPicture": "chatimage.png",
    "footer": "This is a HTML string displayed at the bottom of the web page when a user is logged in.",
    "loginfooter": "This is a HTML string displayed at the bottom of the web page when a user is not logged in."
  },
This will set the title and sub-title text to empty and set the background image to the new title picture file. You can now restart the server and take a look at the web page. Both the desktop and mobile sites will change.
The title image must a PNG image of size 450 x 66.
You can also customize the server icon in the “My Server” tab. By default, it’s a picture of a desktop with a padlock.
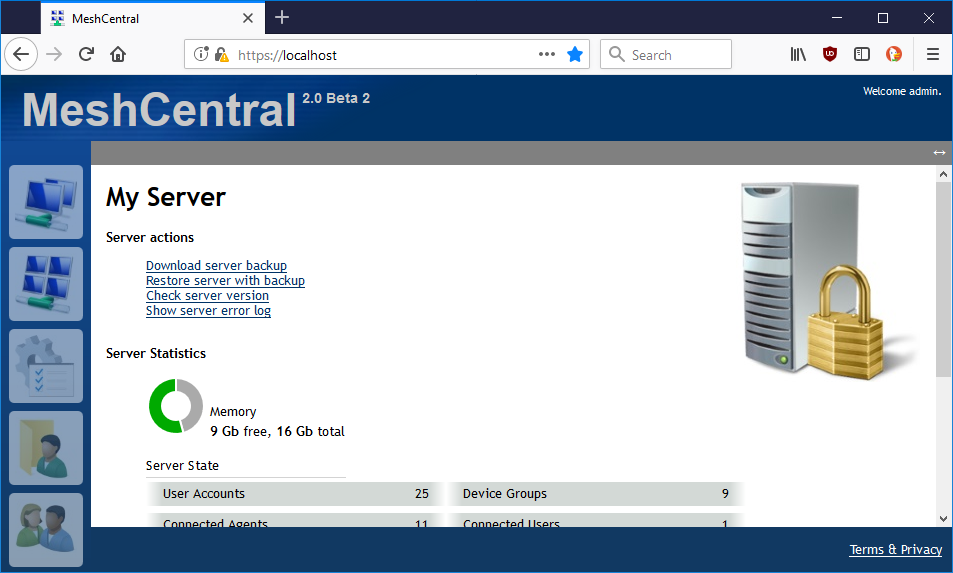
If, for example, MeshCentral is running on a Raspberry Pi. You may want to put a different picture at this location. Just put a “server.jpg” file that is 200 x 200 pixels in the “meshcentral-data” folder. The time MeshCentral page is loaded, you will see the new image.
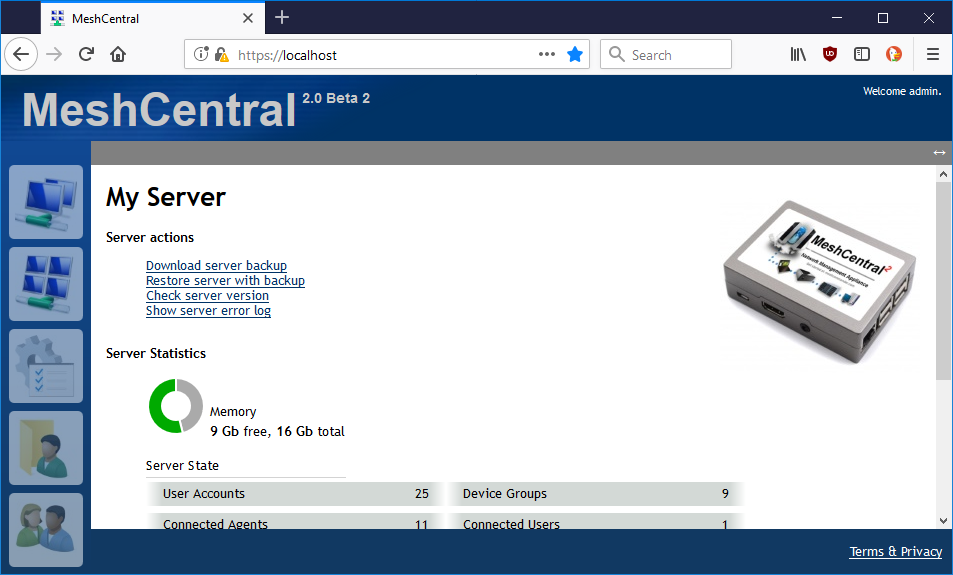
This is great to personalize the look of the server within the web site.
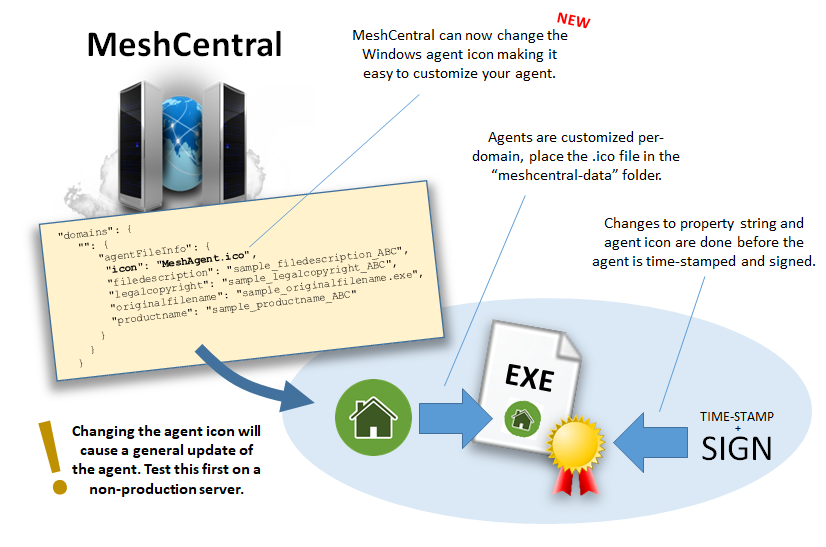
Customizing Web Icons
MeshCentral lets you change the icons for different devices shown in the Web User Interface. To do this the proper way, you should make a new folder called meshcentral-web in the main directory, where you find other folders like meshcentral-data, meshcentral-backup, meshcentral-files, and node-modules. Inside meshcentral-web, make another folder named public and copy the entire node_modules/meshcentral/public/images folder into this new meshcentral-web/public folder and then edit the files in meshcentral-web/public/images/. This step is suggested because if MeshCentral updates, it might delete any changes in node_modules. But, changes in meshcentral-web will stay safe, and MeshCentral will use these files instead of the originals in node_modules.
To update device icons, you need to edit these files: meshcentral-web/public/images/webp/iconsXX.webp (icons16.webp, icons32.webp, icons50.webp, icons100.webp), and meshcentral-web/public/images/iconsXX.png (icons16.png, icons32.png, icons50.png, icons64.png, icons100.png) and the corresponding meshcentral-web/public/images/icons256-X-1.png. Make sure to keep the resolution of these files as it is.
By following these steps, you can customize any icon in MeshCentral. Just find and change the corresponding image files in the meshcentral-web/public/images folder. Similarly, you can also move other folders from node_modules/meshcentral to meshcentral-web while keeping the original folder structure. This allows you to modify other parts of MeshCentral too, like the .handlebars templates for the web interface. Simply copy files from node_modules/meshcentral/views to meshcentral-web/views and make your changes in meshcentral-web. This lets you match MeshCentral's look to your company's brand or your own style.
![]()
Customizing Agent Invitation
Agents can be invited by public link or via email. Click Here to see details.
Agent Branding
You can customize the Agent to add your own logo, change the title bar, install text, the service name, or even colors!
Note
The Customization must be done FIRST and BEFORE you deploy your agents! Once the agents have been deployed, any customization made afterwards, will not sync! This is because the setup files are customized on the fly, then when you install the agents, the exe and .msh file with the customizations in are copied over to the required folder, so you will need to reinstall the agent for agent customizations to take effect.
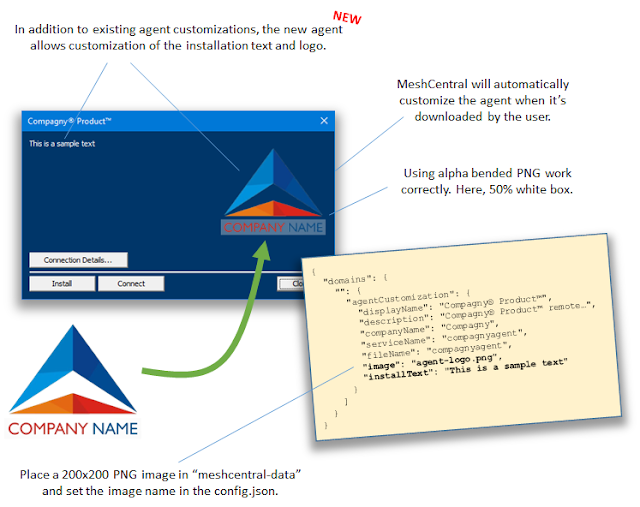
"domains": {
    "": {
        "agentCustomization": {
            "displayName": "MeshCentral Agent",
            "description": "Mesh Agent background service",
            "companyName": "Mesh Agent Company",
            "serviceName": "Mesh Agent Service",
            "installText": "Text string to show in the agent installation dialog box",
            "image": "mylogo.png",
            "fileName": "meshagent",
            "foregroundColor": "#FFA500",
            "backgroundColor": "#EE82EE"
        }
    }
}
Terms of use
You can change the terms of use of the web site by adding a “terms.txt” file in the “meshcentral-data” folder. The file can include HTML markup. Once set, the server does not need to be restarted, the updated terms.txt file will get used the next time it’s requested.
For example, placing this in “terms.txt”
<br />
This is a <b>test file</b>.
Will show this on the terms of use web page.